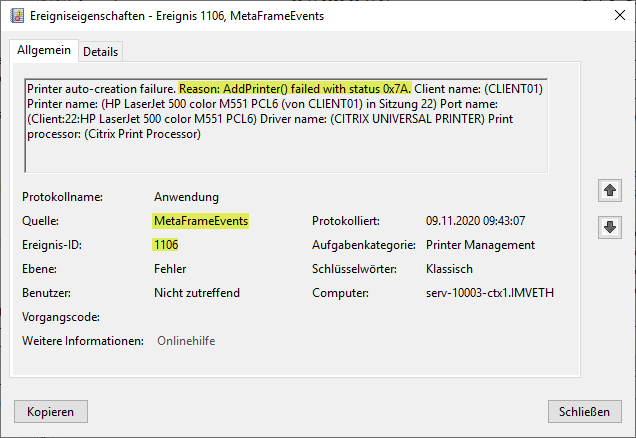
Today I came across an issue where printer auto creation failed for a couple of HP printers on one client computer only. The XenDesktop worker showed an Event ID 1106 stating Printer auto-creation failure. Reason: AddPrinter() failed with status 0x7A.
Searching for this particular error didn’t reveal anything helpful. So I had to start digging into it by myself.
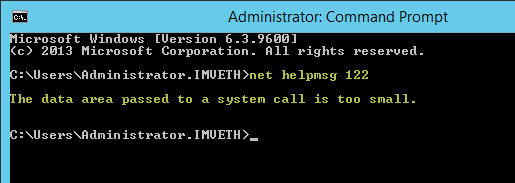
Converting hex 7A into decimal 122 and using net helpmsg122 does provide some additional information:
The data area passed to a system call is too small.
Searching for this error message revelead that there is an issue with the printer or the driver associated with it on the client. It looks like the printer drivers were not installed properly in the users PC. Re-installing the driver on the workstation solved the issue.
Just recently I came across an expired Server Certificate on my Citrix License Server v12.x. As everybody might know, the Citrix License Server is based on an Apache Tomcat webserver running on your Windows Server. During installation a self-signed server certificate is being issued and bound to the Apache’s web server port 8083. So how are you supposed to renew the server certificate in case it has expired and you need secure access to the corresponding Citrix License Server features?
To help you set up NetScaler for ShareFile with on-premises storage zone controllers, an easy-to-use wizard is included in the GUI. The wizard prompts you for basic information about your StorageZones Controller environment and then generates a configuration that:
Load balances traffic across StorageZones Controllers
Provides user authentication for StorageZone Connectors
Validates URI signatures for ShareFile uploads and downloads
Terminates SSL connections at the NetScaler appliance
After running the built-in Setup Citrix ADC for ShareFile wizard, users starting complaining that they cannot access their network shares anymore. Those network shares have been provided via the integrated ShareFile Connector’s funcionality and has been up and running very smoothly prior to adding Netscaler to the equation.
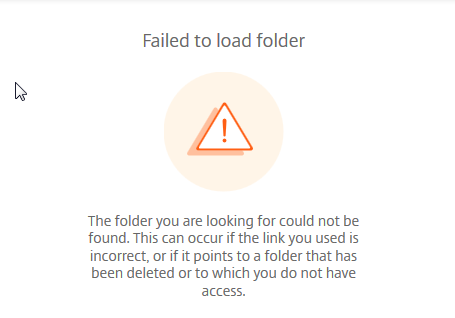
As soon as users tried to access a network share via a StorageZone Connector they received an error indicating “Failed to load folder -The folder you are looking for could not be found”:
As per Citrix, you may see following error while accessing Network Shares on ShareFile Web App:
The folder you are looking for could not be found. This can occur if the link you used is incorrect, or if it points to a folder that has been deleted or to which you do not have access.
Mind that this happened with the ShareFile Web App only while accessing network shares, i.e. using within a browser, whereas accessing the exact same network share via Citrix Files for iOS worked like a charm. After having consulted our change management documentation, it quickly became clear that only one culprit could remain, as there has been no change in user passwords, permissions, group memberships, UNC paths regarding the underlying network shares, et al. All users have required permissions. The root cause could only be traced back to the changes in the Netscaler configuration a couple of days earlier. So I started investigating the details of the Setup Citrix ADC for ShareFile wizard, its configuration changes and effects on my setup by reading ShareFile On-prem and NetScaler: A Comprehensive Configuration Guide & Deep Dive, amongst others:
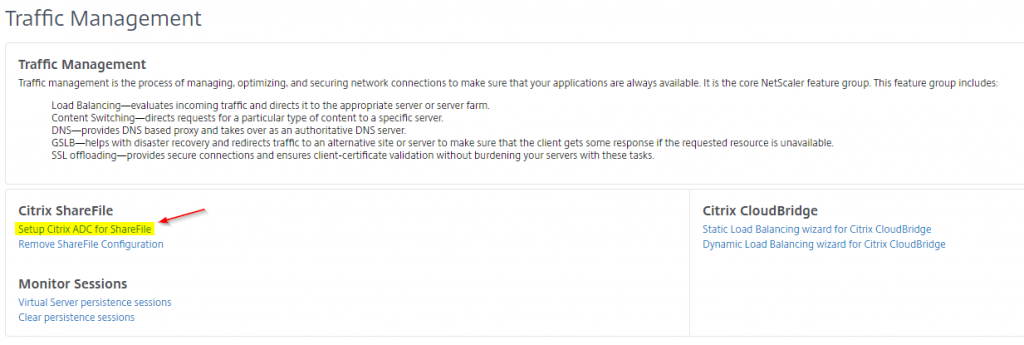
In case you messed up with your ShareFile Configuration: you can try to remove it with Remove ShareFile Configuration
With having a better understanding of all things Netscaler & Sharefile, I did a little research and found a Citrix Discussion dealing with my issue and it turned out that the Setup Citrix ADC for ShareFile wizard (to the contrary) does not handle all the configuration required to access network shares via a StorageZone connector. Further configuration as to be done manually to make it work (again), as can be read here:
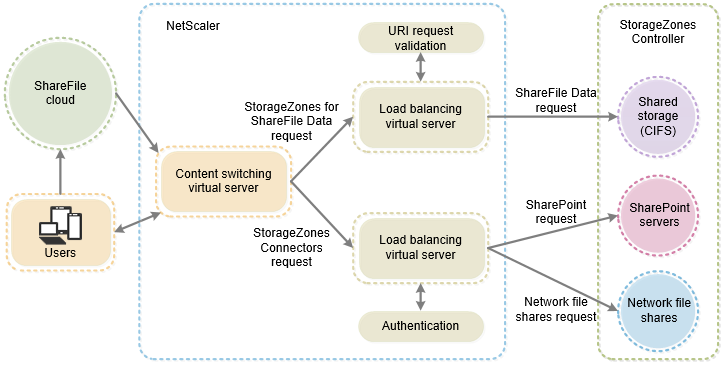
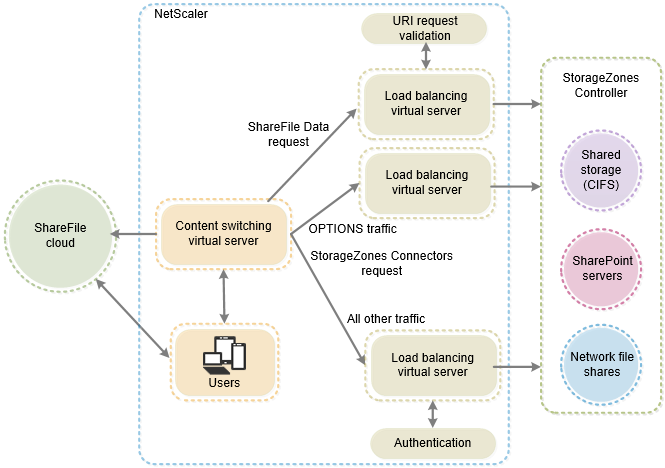
To support restricted zones or web access to StorageZone Connectors, you must perform additional NetScaler configuration after you complete the NetScaler for ShareFile wizard.
The additional configuration provides the Netscaler components shown in the following diagram:
The description of the additional configuration of Netscaler in Citrix Docs is – to say the least – not very accurate. Without appropriate formatting of the corresponding text passages and additional depictions illustrating every single configuration step, manual adjustments are difficult to comprehend for non-Netscaler-aficionados. Therefore I’d like to expand on Citrix Docs and provide a more elaborate description of the configuration steps required. So, what do we need to add to the existing Netscaler configuration:
a third NetScaler load-balancing virtual server
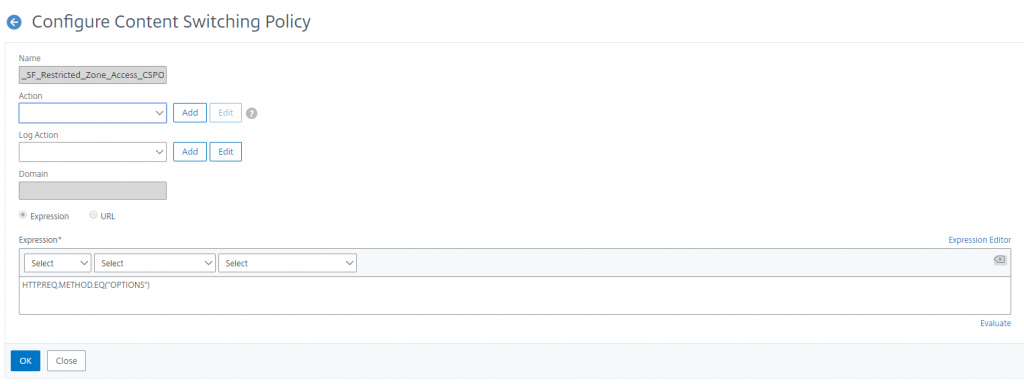
a third CS policy to allow anonymous access from clients for the HTTP OPTIONS verb
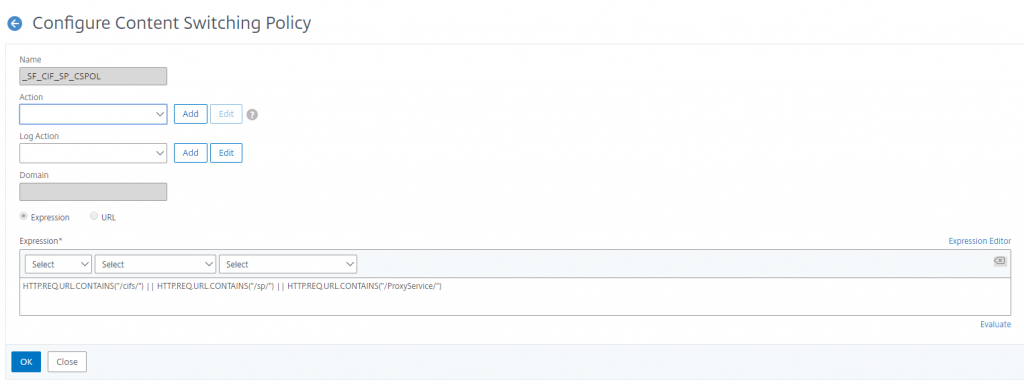
update the existing CS policy used for traffic to StorageZone Connectors (by default: _SF_CIF_SP_CSPOL)
update the existing CS policy used for traffic to StorageZones for ShareFile Data (by default: _SF_SZ_CSPOL)
create a heartbeat monitor for the StorageZones Controller service and bind it to the CS virtual server for ShareFile
verify the ShareFile Load Balancing configuration
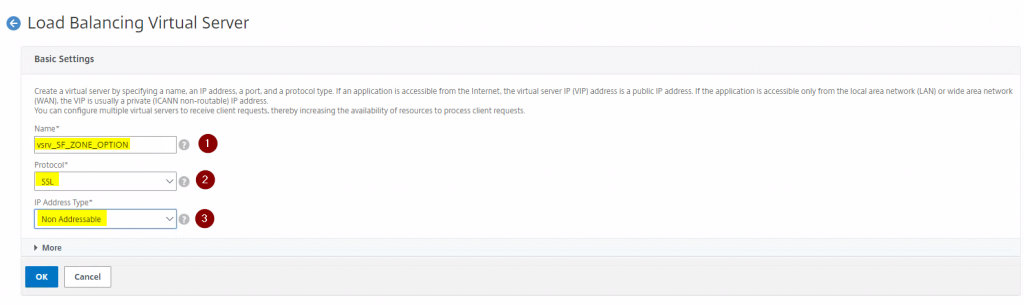
First, add a new Load Balancing vServer as follows:
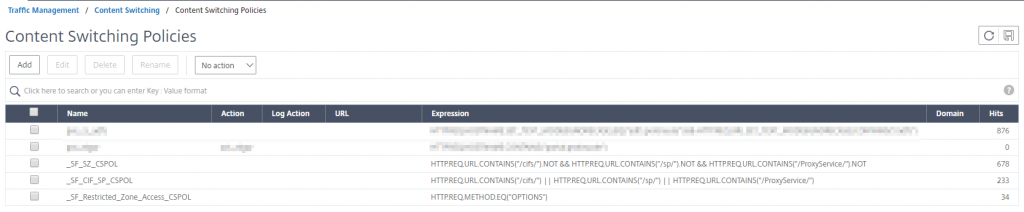
In the end your CS policies should look like this (in terms of Expressions):
final CS policies and corresponding Expressions
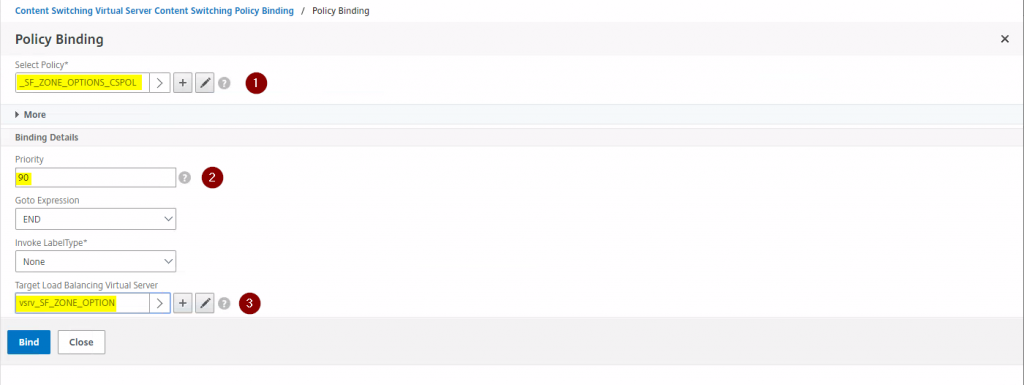
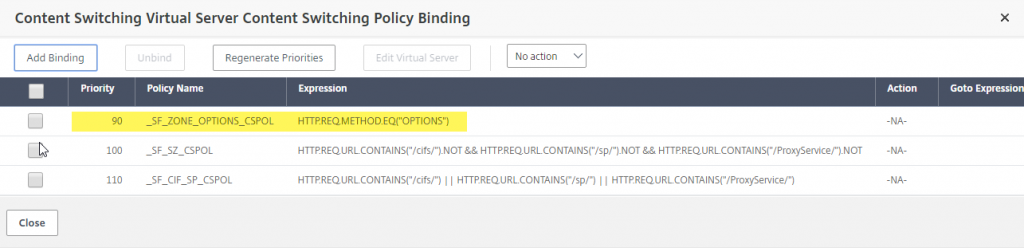
Now adjust the existing CS vServer for Sharefile (in my case vsrv_SF_CS_ShareFile) regarding its Policy Bindings in that you add the newly created CS Policy (in my case _SF_ZONE_OPTIONS_CSPOL) as the third CS policy with a Priority of 90 and set the Target Load Balancing Virtual Server to the newly created LB vServer (in my case vsrv_SF_ZONE_OPTION):
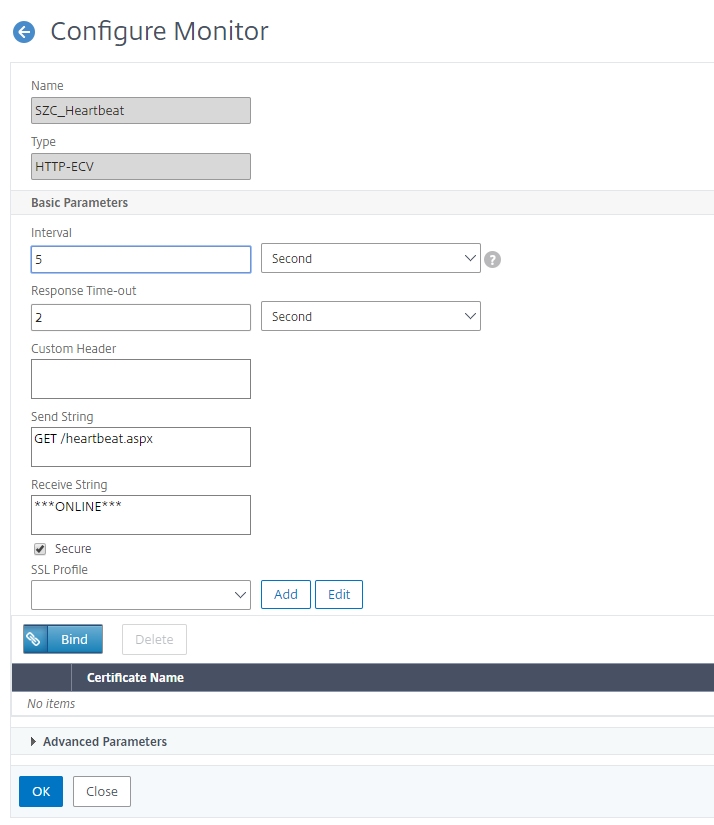
The StorageZone Hearbeat Monitor can be added using CLI by running the following commands:
add lb monitor SZC_Heartbeat HTTP-ECV -send "GET /heartbeat.aspx" -recv "***ONLINE***” -secure YES
bind service <Name of your LB service i.e. internal SF server> -monitorName SZC_Heartbeat
The newly added StorageZone Heartbeat Monitor should look as follows:
StorageZone Heartbeat Monitor Configuration
The complete CLI command list would look like this, whereas the following values need replacement according to your environment:
CertDisplayName (server certificate name you want to bind to your vServer)
NameOfYourSFServer (i.e. the Sharefile Server you’ve added to your NetScaler configuration)
NameOfYourSFCSvServer (i.e. the Sharefile Content Switching vServer)
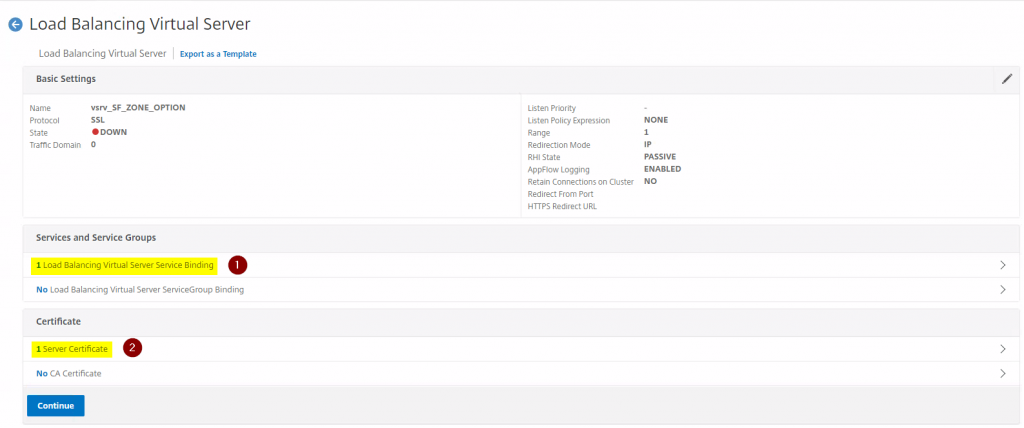
Finally, go to Traffic Management > Load Balancing > Virtual Servers to view the status of the load balancing virtual servers created for ShareFile. It may look similar to my configuration:
Virtual Servers configured for ShareFile Load Balancing
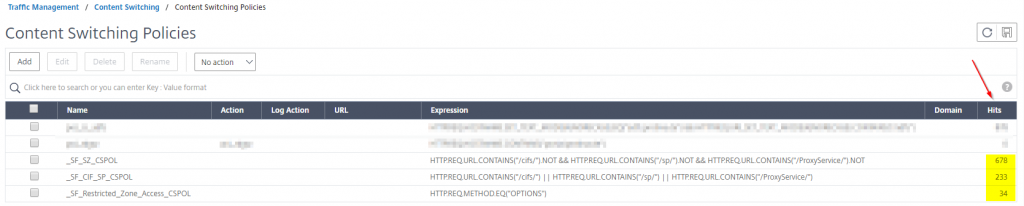
While testing your new configuration and accessing network shares via ShareFile connectors you should see an increasing hit number in the Hits column of your corresponding CS policies:
Increasing hit number in the Hits column
Update You have to consider network restrictions as well, as Security can mess with ShareFile traffic and network flow, especially when Firewall settings do not allow corresponding (read: whitelisted) traffic to ShareFile domains, endpoints, and IPs, i.e. the ShareFile Control Plane IP ranges. Have a look at CTX208318 and CTX234446.
In another case, if you attempt to access the ShareFile network share and it prompts for users credentials, the ShareFile Web App credentials may not work. Have a look at CTX233739 as well:
Solution Authentication settings of an IIS CIFS server on StorageZone Controller needs correction. Please follow the steps to resolve the issue:
1. Log onto the StorageZone Controller(s) and open IIS. 2. Expand Default web site 3. Click on the CIFS virtual directory, then on Authentication. 4. Ensure Anonymous is Enabled 5. ASP .NET Impersonation is Disabled 6. Basic Authentication is Enabled 7. Forms Authentication is Disabled 8. Windows Authentication is Disabled
Reference: The Authentication settings of an IIS CIFS server
Warning! Any customization within NetScaler or NetScaler Gateway might cause unexpected behavior during and after the upgrade or the downgrade process, and possible configuration loss. Any sort of customization within NetScaler or NetScaler Gateway should be backed up and removed before the upgrade or the downgrade process.
How to backup a existing NetScaler configuration
See my other blog entry on automated NetScaler backups:
with GUI
with CLI
with Nitro/Powershell
Upgrade firmware via CLI
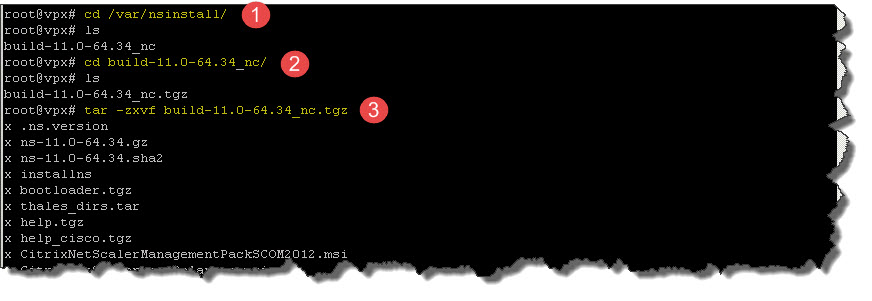
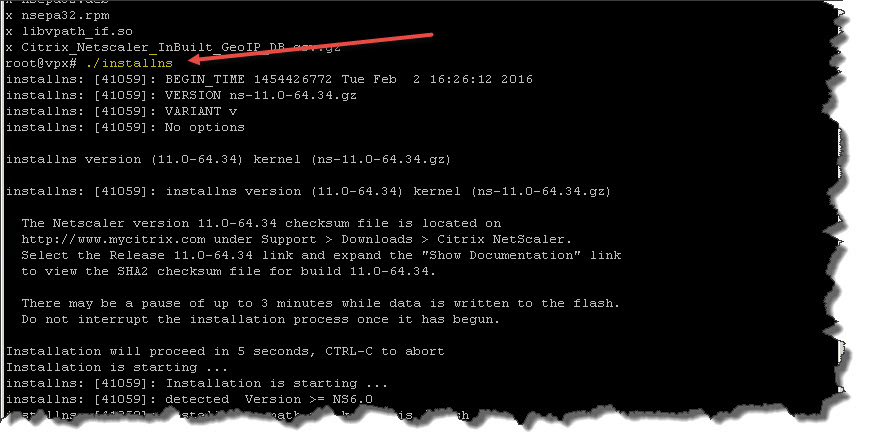
Before you run the install script, the files must be extracted and placed on the appliance. Use the following command to uncompress the bundle located, for instance, in /var/nsinstall/build-11.0-64.34_nc/:
tar -zxvf <archive_filename>.tgz
The run the following command to initiate the upgrade process:
./installns
root@ns# ./installns
installns: [78217]: BEGIN_TIME 1444030959 Mon Oct 5 09:42:39 2015
installns: [78217]: VERSION ns-11.0-62.10.gz
installns: [78217]: VARIANT v
installns: [78217]: No options
installns version (11.0-62.10) kernel (ns-11.0-62.10.gz)
installns: [78217]: installns version (11.0-62.10) kernel (ns-11.0-62.10.gz)
The Netscaler version 11.0-62.10 checksum file is located on
http://www.mycitrix.com under Support > Downloads > Citrix NetScaler.
Select the Release 11.0-62.10 link and expand the “Show Documentation” link
to view the SHA2 checksum file for build 11.0-62.10.
There may be a pause of up to 3 minutes while data is written to the flash.
Do not interrupt the installation process once it has begun.
Installation will proceed in 5 seconds, CTRL-C to abort
Installation is starting …
installns: [78217]: Installation is starting …
installns: [78217]: detected Version >= NS6.0
installns: [78217]: Installation path for kernel is /flash
CallHome feature is currently disabled. Enabling this feature lets this
NetScaler device/instance automatically alert Citrix support on detecting
critical errors and/or potential failures, before it impacts your network.
You can also configure this feature anytime using the command line interface
(“enable feature callhome”) or the configuration utility. Please see the
documentation for further details.
Do you want to enable it NOW? [Y/N] N
installns: [78336]: Size of kernel ns-11.0-62.10.gz is 130936 kilobytes
installns: [78336]: Available space on /flash/ filesystem is 842440 kilobytes
installns: [78336]: Available space on /var is 7626642 kilobytes
installns: [78336]: Checking directories …
installns: [78336]: Checksumming ns-11.0-62.10.gz …
installns: [78336]: Checksum ok.
Copying ns-11.0-62.10.gz to /flash/ns-11.0-62.10.gz …
installns: [78336]: Copying ns-11.0-62.10.gz to /flash/ns-11.0-62.10.gz …
installns: [78336]: BEGIN KERNEL_COPY
…………….
installns: [78336]: END KERNEL_COPY
installns: [78336]: Changing /flash/boot/loader.conf for ns-11.0-62.10 …
Installing XML API documentation…
installns: [78336]: Installing XML API documentation…
Installing NSConfig.wsdl…
installns: [78336]: Installing NSConfig.wsdl…
Installing NSStat.wsdl…
installns: [78336]: Installing NSStat.wsdl…
Installing online help…
installns: [78336]: Installing online help…
Installing Cisco online help…
installns: [78336]: Installing Cisco online help…
Installing Logon Point …
installns: [78336]: Installing Logon Point …
Couldnt execute eula_upgrade.pl error: 6400
installns: [78336]: Couldnt execute eula_upgrade.pl error: 6400
Installing Login Schema files …
installns: [78336]: Installing Login Schema files …
Installing SCOM Management Pack…
installns: [78336]: Installing SCOM Management Pack…
Installing LoadBalancer Pack…
installns: [78336]: Installing LoadBalancer Pack…
Installing GUI…
installns: [78336]: Installing GUI…
Installing EPA Package …
installns: [78336]: Installing EPA Package …
Installing Mac EPA and Mac EPA version file…
Installing Linux EPA and Linux EPA version file…
installns: [78336]: Installing Linux EPA and Linux EPA version file…
Installing NITRO…
installns: [78336]: Installing NITRO…
Installing Debian, RPM packages …
installns: [78336]: Installing Debian, RPM packages …
Installing Jazz certificate …
installns: [78336]: Installing Jazz certificate …
Installing Call Home certificate …
installns: [78336]: Installing Call Home certificate …
Installing Upload server certificate …
installns: [78336]: Installing Upload server certificate …
/var/opt/nfast directory exists. Extracting hardserver files.
installns: [78336]: /var/opt/nfast directory exists. Extracting hardserver files.
Creating before PE start upgrade script …
installns: [78336]: Creating before PE start upgrade script …
Creating after upgrade script …
installns: [78336]: Creating after upgrade script …
installns: [78336]: prompting for reboot
installns: [78336]: END_TIME 1444031171 Mon Oct 5 09:46:11 2015
Installation has completed.
Reboot NOW? [Y/N] Y
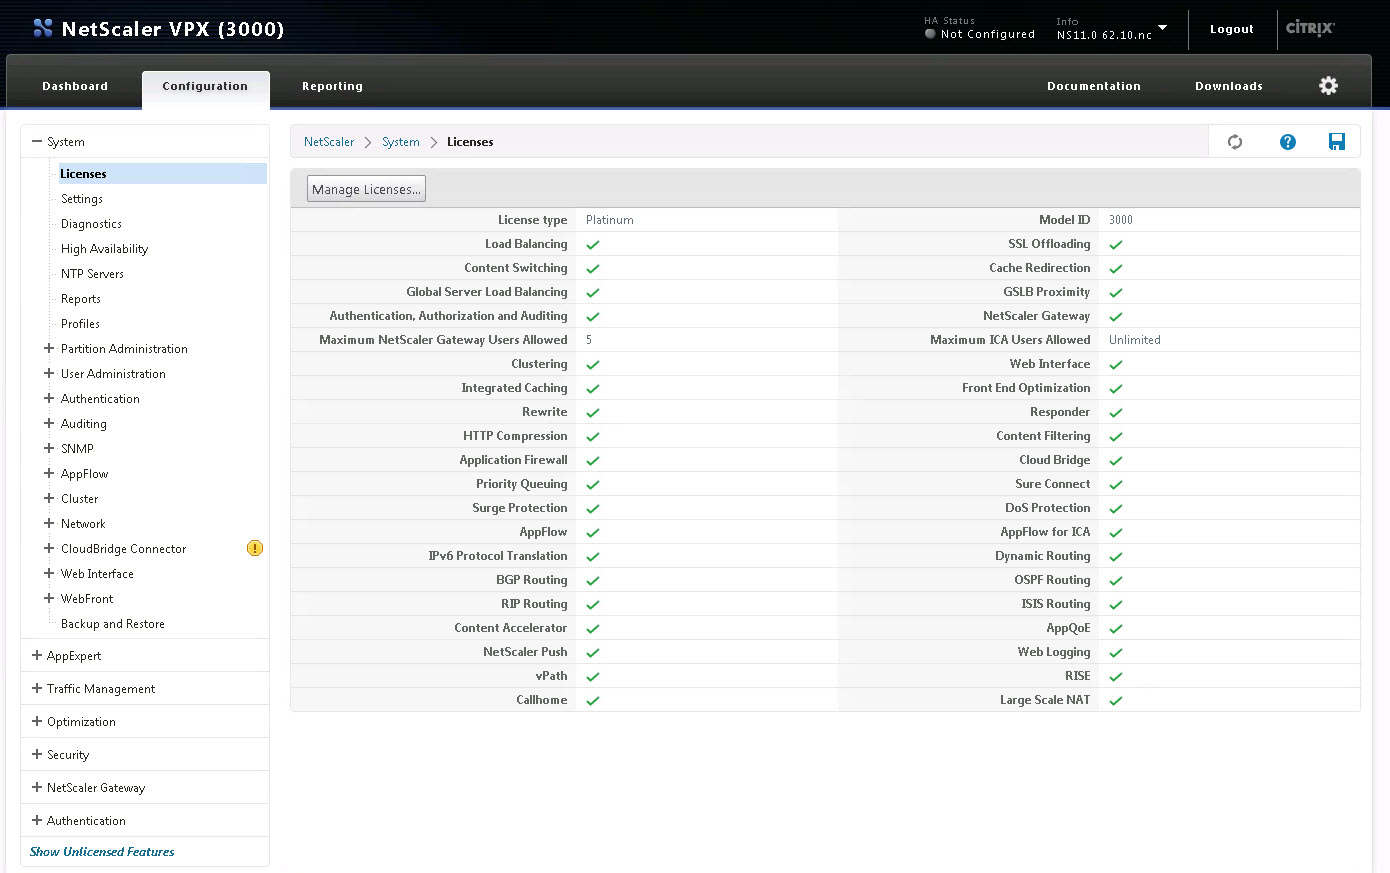
After the upgrade has been successfully completed simply reboot your NetScaler by entering Y and pressing <Enter>. After abouot 90 seconds the NetScaler will be back online and accessible through your browser. Log back in and verify whether the upgrade has been completed successfully by checking your firmware version and license status:
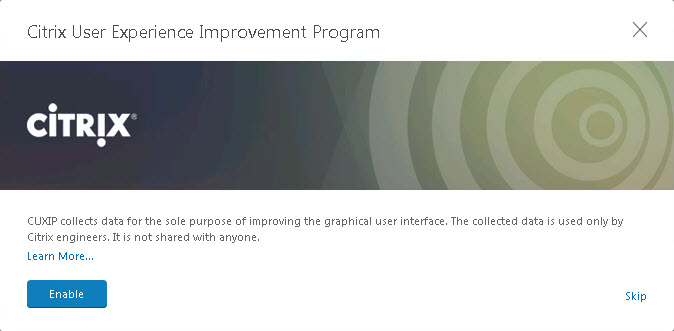
In case you get bogged by the newly added feature called CUXIP (Citrix User Experience Improvement Program), you’re free to chose whether you want to enable it or not.
After that verify the NetScaler Gateway’s functionality by logging in to your vServer’s public Gateway and launching any published resources.
To get hands on every single information of your current Broker Sessions simply run:
Get-BrokerSession | Out-GridView
Now, in terms of historical session and connection information you have to query the OData API (http://<ServerBrokerFQDN>/Citrix/Monitor/OData/v2/Data), as with the Get-BrokerSession cmdlet you only get information on current sessions. So in case you’re looking for historical reports and data, which you cannot find in the Director Web UI, you could simply create a custom report with Microsoft Excel by connecting to the Data Feed.
This leaves me with recommending the following Citrix Blog Article, that explains how to
connect and read the available OData Data Feed from your Citrix Broker Server,
read the content of the Connection table and import it into an Excel Sheet,
limit the data’s timeframe we’re looking at,
add a PivotChart, and
filter the required data.
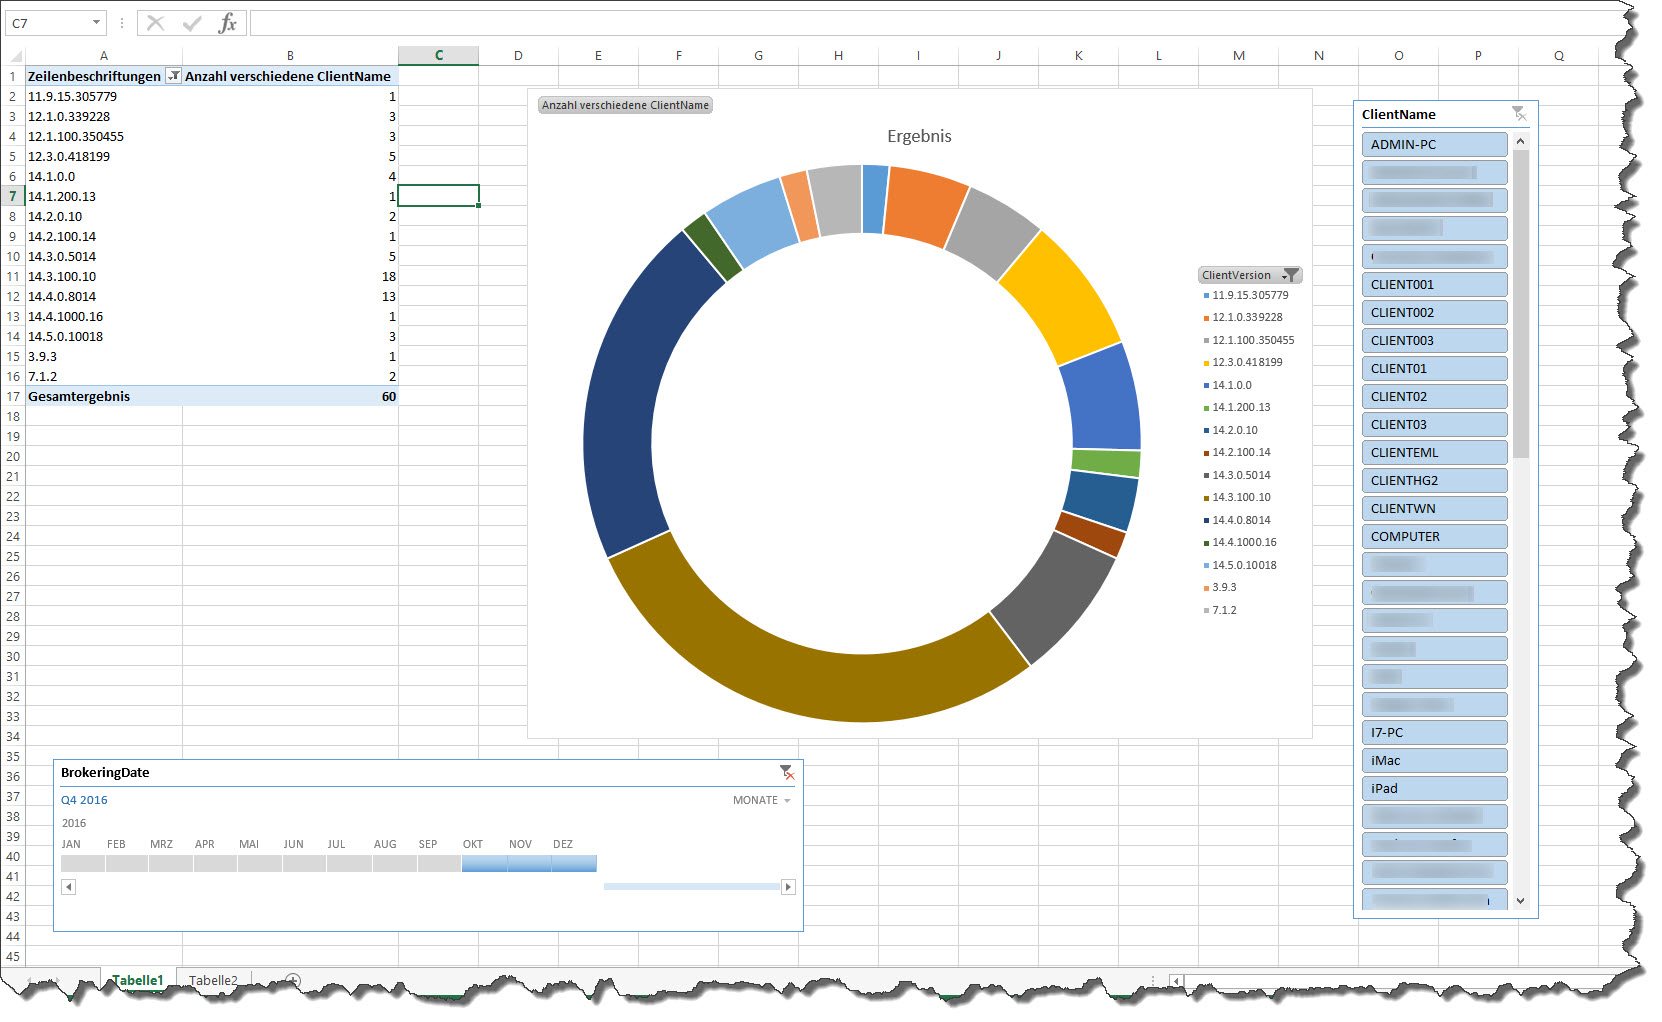
The result might look something like this:
You can then tinker with the different tables available through the Data Feed in order to achieve the resultant data set required for your purpose. As opposed to the aforementioned Citrix Blog you could select the following tables to even get information on Citrix Receiver Versions, Client Names, and corresponding User Names:
Connection
Session
User
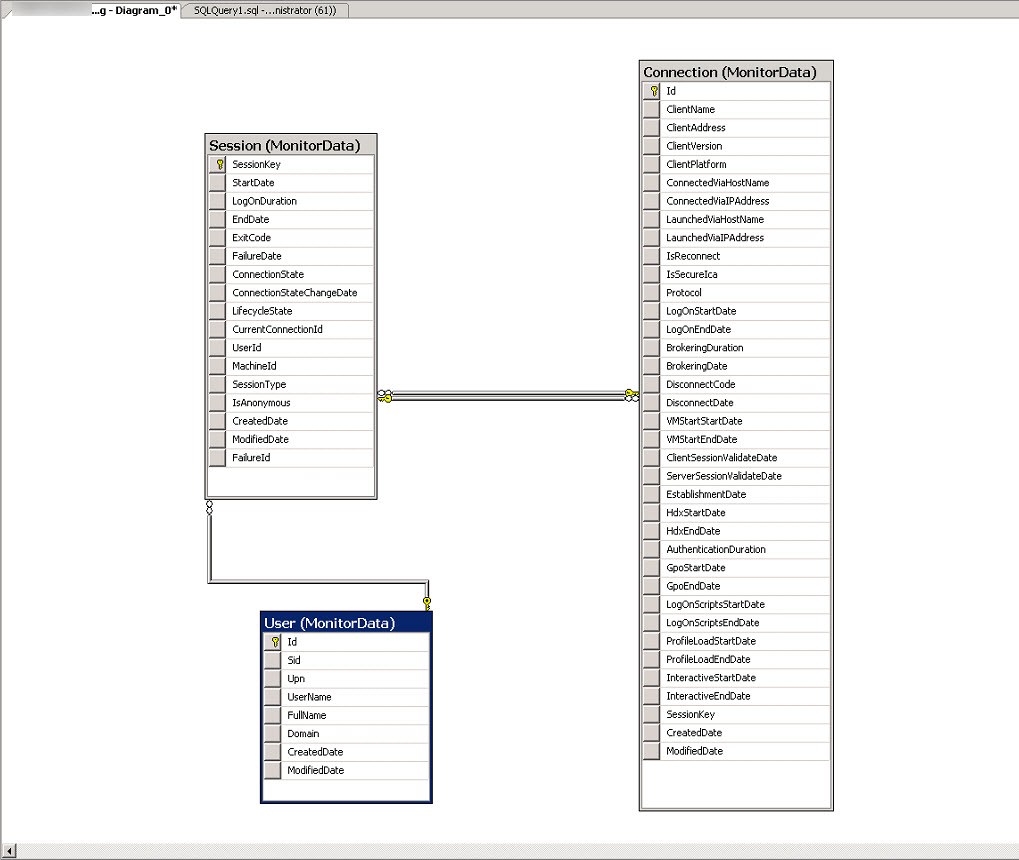
Just have a look at the underlying SQL DB and its Database Diagram in order to reveal the tables’ relationships:
Relationship Name
Table Name
Tables Specification
Columns Specifiation
Session_User
Sessions
Foreign Key Column
UserId
Users
Primary Key Column
Id
Connection_Session
Foreign Key Column
SessionKey
Primary Key Column
SessionKey
Session_CurrentConnection
Connections
Foreign Key Column
CurrentConnectionId
Sessions
Primary Key Column
Id
Then you should be able to rebuild these relationships within Microsoft Excel and get the resultant set of data including corresponding user names:
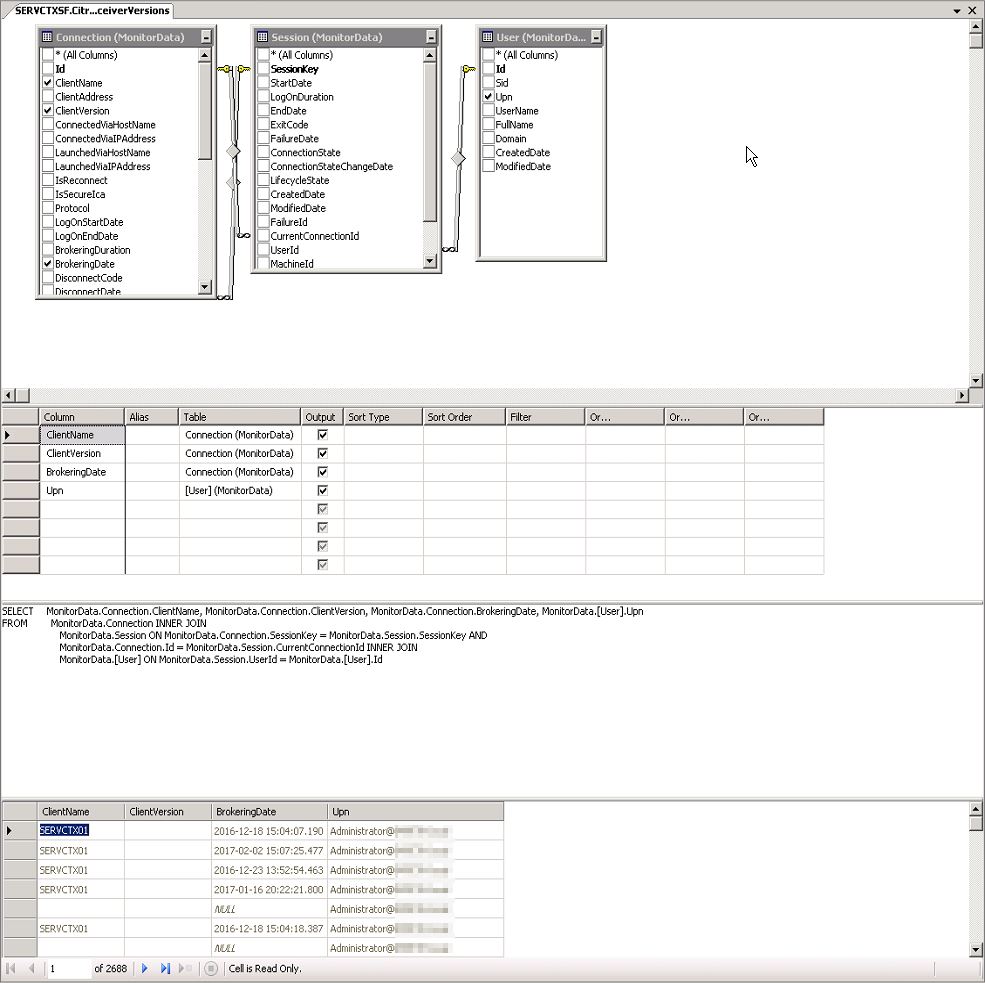
Otherwise you could create a corresponding View directly within SQL Server Management Studio on the server hosting your XenDesktop SQL Monitoring database. I created one and called it v_ReceiverVersions, thus allowing me to access the data through Excel as well. The custom View includes the aforementioned tables
Connection (MonitorData)
Session (MonitorData)
User (MonitorData)
SELECT MonitorData.Connection.ClientName, MonitorData.Connection.ClientVersion, MonitorData.Connection.BrokeringDate, MonitorData.[User].Upn
FROM MonitorData.Connection INNER JOIN
MonitorData.Session ON MonitorData.Connection.SessionKey = MonitorData.Session.SessionKey AND
MonitorData.Connection.Id = MonitorData.Session.CurrentConnectionId INNER JOIN
MonitorData.[User] ON MonitorData.Session.UserId = MonitorData.[User].Id
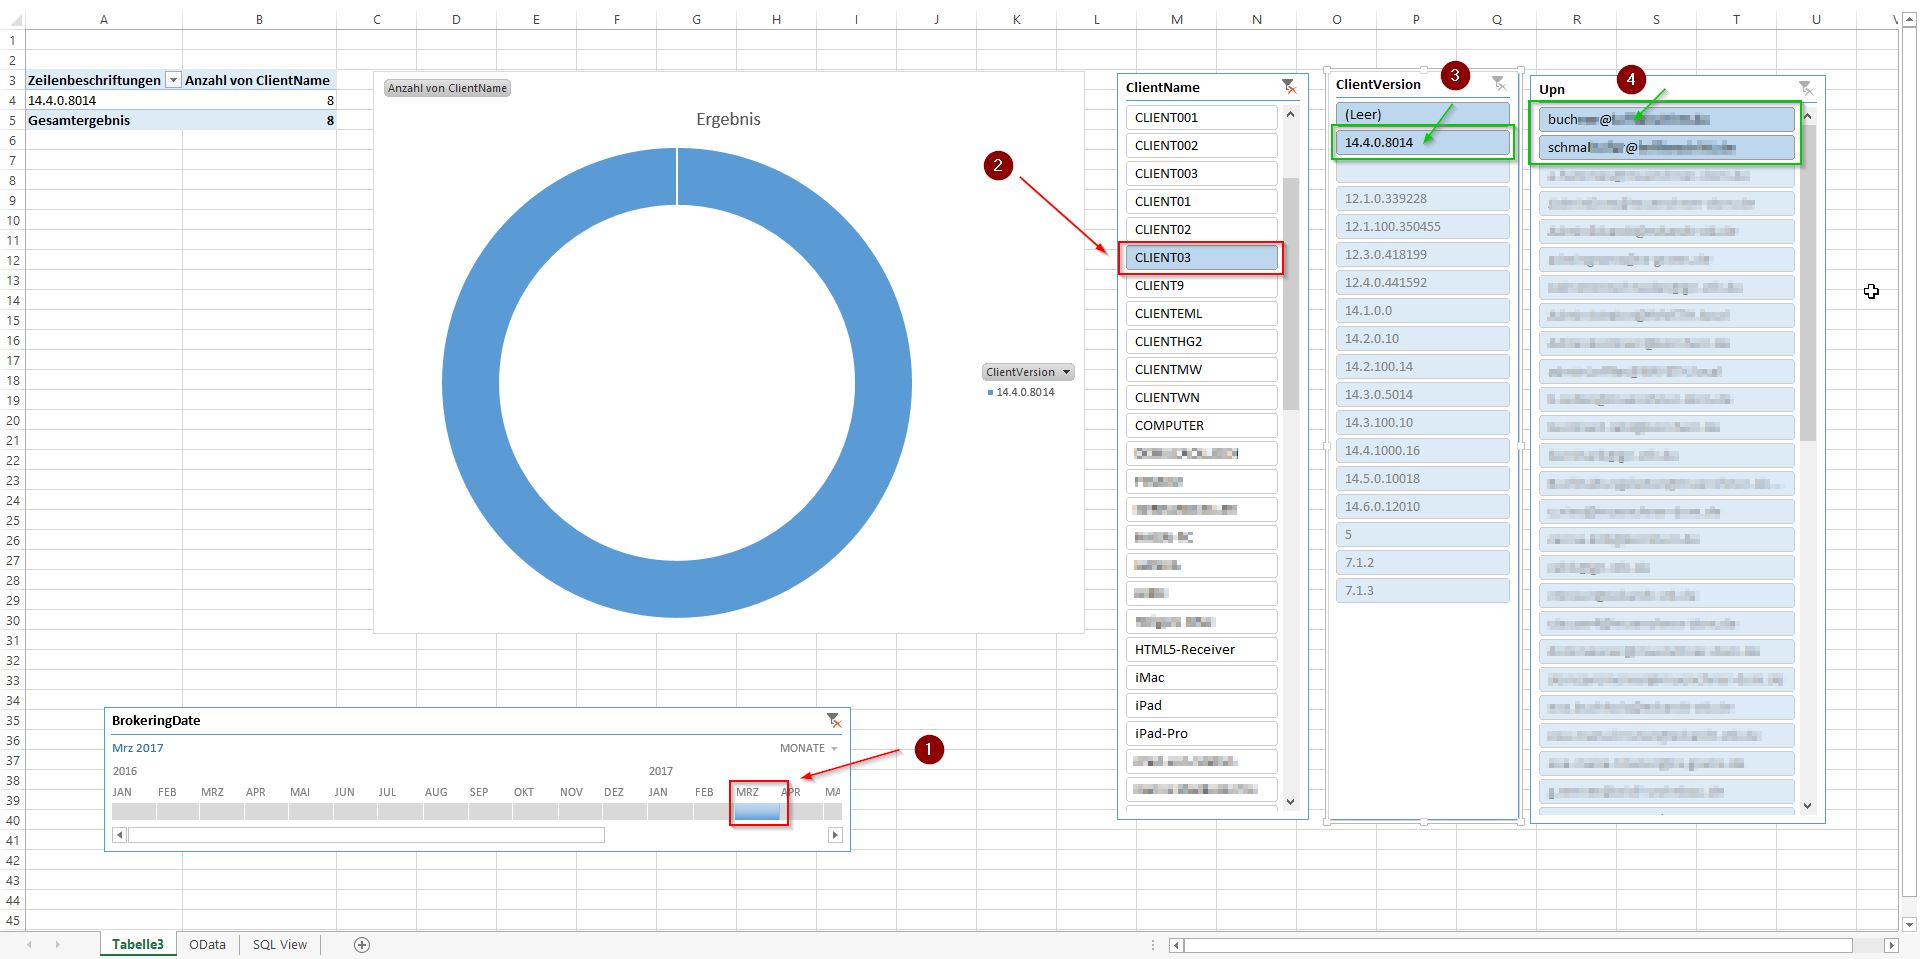
This setup allows me to filter the available data (i.e. set to the required period in time by utilizing the BrokeringDate) by either choosing ClientName, ClientVersion or UPN:
The data available in Citrix Director is dependent on your Citrix License, which in turn determines your usage data retention within Citrix Director. As per Citrix:
All editions: Director – real-time monitoring and basic troubleshooting (up to 7 days of data)
XD7 Platinum: EdgeSight performance management feature – includes #1 + historical monitoring (up to a full year of data through the monitoring SQL database)
XD7 Platinum + NetScaler Enterprise: EdgeSight performance management and network analysis – includes #2 plus 60 mins. of network data
XD7 Platinum + NetScaler Platinum: EdgeSight performance management and network analysis – includes #2 plus unlimited network data
If you want to use your NetScaler for all things that need to be accessible from the outside, over a single IP address, that poses an issue. As is usually a problem with small to medium sized businesses which only have one public IP address at their disposal, and need to implement features like a fully functional RDS environment (with RD Web Access, RD Gateway, etc), a XenApp/XenDesktop evnironment with StoreFront, and even AD FS, say, for Office365. Generally all these services require port 443 (https) to be fully functional, and you can only set up one distinctive IP address on your NetScaler providing this service, pointing it to your internal resources via Firewall rules, thus leaving you with only one option: NetScaler’s Unified Gateway and Content Switching features.
This short blog describes how to enable NetScaler 11’s Content Switching feature to proxy your AD FS infrastructure thus getting rid of a dedicated AD FS Proxy server.
I came upon this quite frequent issue with my XenDesktop 7.8 Hosted Shared Desktop environment based on Windows Server 2008 R2. Folder Redirection via GPO is in place, whereas Citrix User Profile Management is not used.
In order to make this work, check out the Prerequisites section, and read my other articles about installing and configuring AD FS prior to setting them up with ShareFile and/or NetScaler. This setup requires multiple steps with functional verification tests in between each step in order to minimize sources of error.
Prerequisites:
Public Signed Server Certificate adfs.domain.com
Firewall configuration allowing external traffic destined for your internal AD FS server to pass through (https, Port 443)
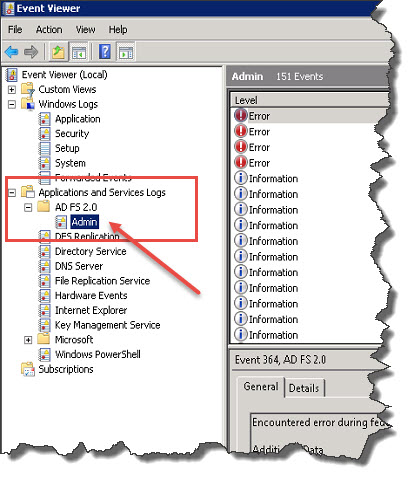
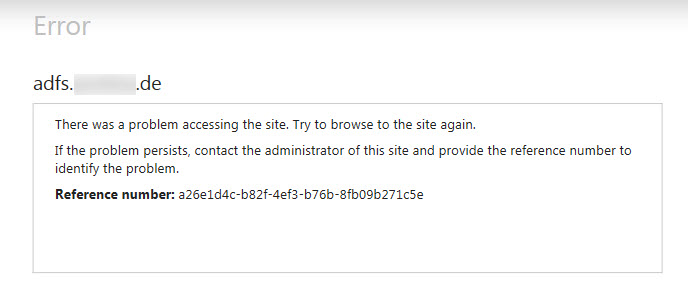
AD FS related errors can be found in the Event Log by expanding the Applications and Services Logs node, and navigating to AD FS 2.0 \ Admin (for Windows Server 2008 and 2008 R2):
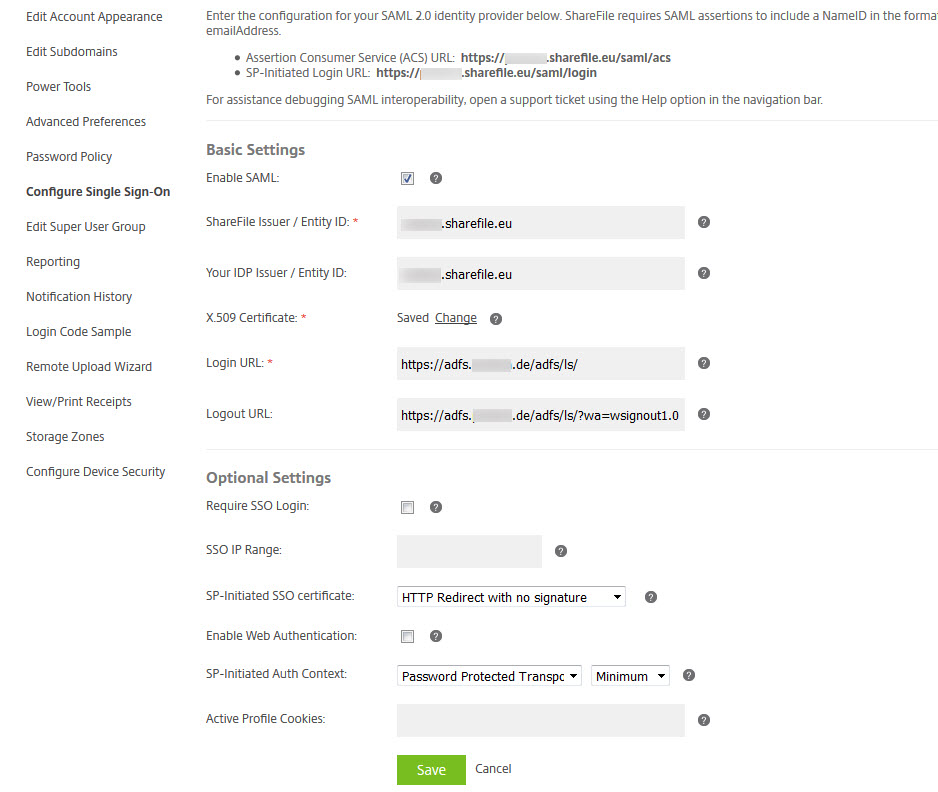
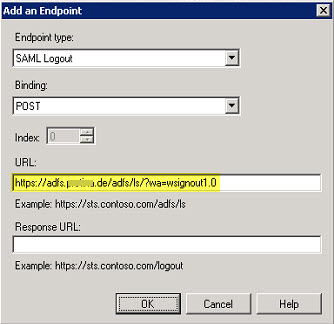
My working ShareFile Single sign-on / SAML 2.0 Configuration with AD FS 2.0 looks like this:
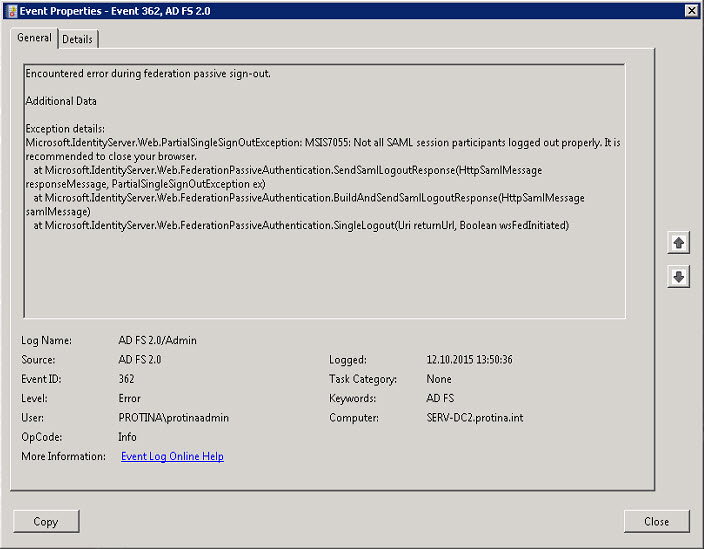
Encountered error during federation passive request.
Additional Data
Exception details:
Microsoft.IdentityServer.Web.RequestFailedException: MSIS7000: The sign in request is not compliant to the WS-Federation language for web browser clients or the SAML 2.0 protocol WebSSO profile.
at Microsoft.IdentityServer.Web.Dispatchers.UnknownRequestDispatcher.DispatchInternal(PassiveContext context)
at Microsoft.IdentityServer.Web.PassiveProtocolHandler.ProcessRequestInternal(PassiveContext context)
at Microsoft.IdentityServer.Web.PassiveProtocolHandler.ProcessRequest(HttpContext context)
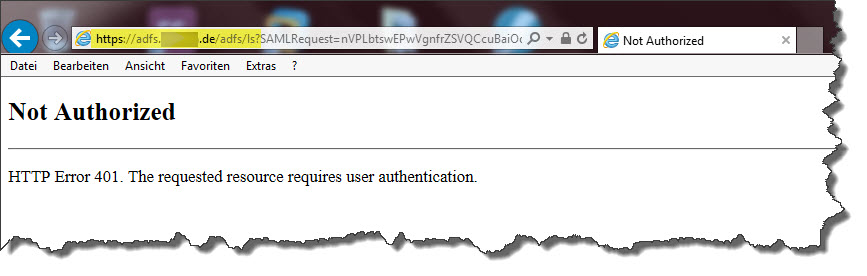
ADFS v2 does not support WS-Federation POST sign-in, only GET.
HTTP Error 401. The requested resource requires user authentication
It turned out I had to start the AD FS service with proper credentials. As I had issues with launching the service, I switched it to LOCAL SYSTEM, which in return caused this particular issue. So, first I had to remedy the issue of failed service start by configuring the SPN for the service account, and providing internet access to my AD FS server in order to enable querying if CRL through .NET. Then I adjusted the corresponding Application Pool in IIS on my AD FS server in order to reflect the AD FS service’s account. In the end I was able to start the service properly. Afterwards SAML SSO from internal networks worked as well.
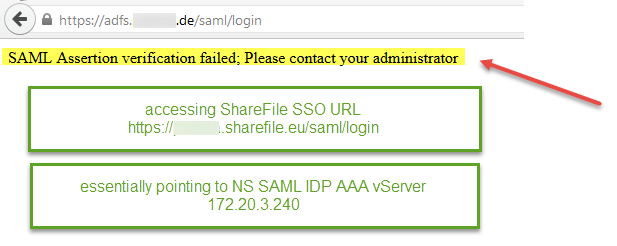
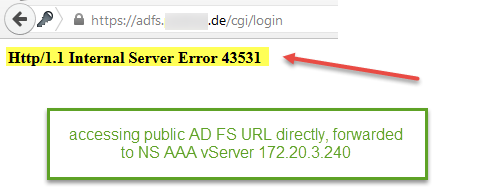
Now as we have successfully configured a working SSO environment using ShareFile and AD FS, we can go the extra mile and add NetScaler to the equation, of course as a means of security enhancement. As you should never ever expose an ADFS server to the internet, you could use NetScaler as a Proxy. Read more about in my blog article https://blog.ollischer.com/citrix-netscaler-v11-how-to-setup-your-netscaler-as-an-ad-fs-proxy.
Errors:
“SAML Assertion verification failed; Please contact your administrator“, i.e. incorrect IDP certificate configured on NetScaler
Http/1.1 Internal Server Error 43531
Run one of the following commands from the shell prompt of the NS to view the real time hits on the (as per CTX138840)
authentication policies and session policies applied on the NS Gateway vServer:
nsconmsg –d current –g pol_hits
rewrite policy bound at a global level or to a load balancing, content switching, or NS Gateway vServer:
nsconmsg –d current | egrep –i rewrite
responder policy bound at a global level or to a load balancing, content switching, or NS Gateway vServer:
nsconmsg –d current | egrep –i responder
In order to troubleshoot authentication with Aaad.debug (as per CTX114999) run the following command from the shell prompt of the NS:
cd /tmp
cat aaad.debug
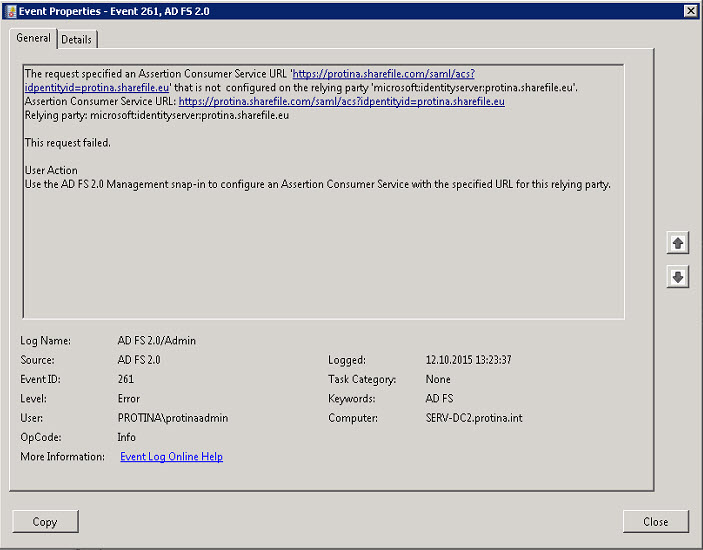
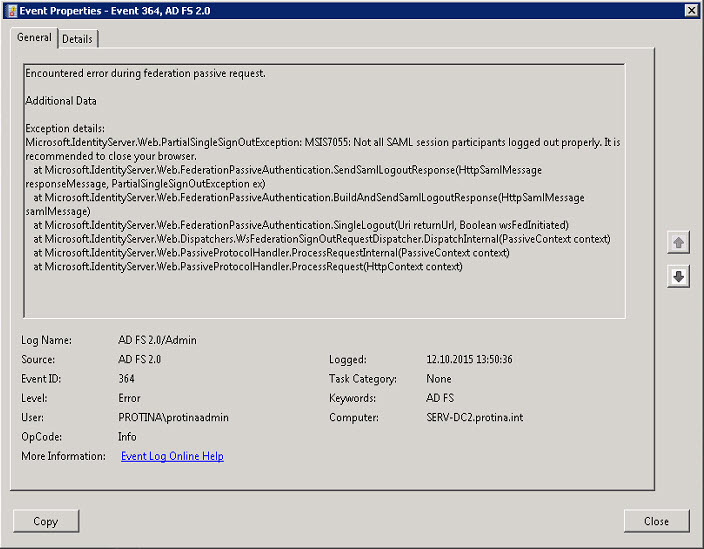
Another Event ID 364 error message:
MSIS2001: Configuration service URL is not configured.
MSIS7012: An error occurred while processing the request. Contact your administrator for details
After checkings the AD FS 2.0 service I discovered that it was not running. When trying to start the service it did not start and subsequent Events 7000 and 70009 were logged in Event Log Viewer. It turned out that the server hosting AD FS 2.0 need internet access or you need to disable generatePublisherEvidence for .NET 3.5. See:
Service Control Manager (SCM) is timing out the service start before it is complete. This is usually due to lack of internet connectivity from the AD FS 2.0 Federation Server or AD FS 2.0 Federation Server Proxy. At service start, when generatePublisherEvidence is enabled for .NET 3.5, the server will attempt to connect to crl.microsoft.com over TCP port 80. AD FS 2.0 does not rely on a positive or negative response from generatePublisherEvidence, and the default value can cause Service Control Manager to time out while waiting on the TCP/80 connection to fail to connect to crl.microsoft.com.
To provide the best experiences, we use technologies like cookies to store and/or access device information. Consenting to these technologies will allow us to process data such as browsing behavior or unique IDs on this site. Not consenting or withdrawing consent, may adversely affect certain features and functions.
Functional
Always active
The technical storage or access is strictly necessary for the legitimate purpose of enabling the use of a specific service explicitly requested by the subscriber or user, or for the sole purpose of carrying out the transmission of a communication over an electronic communications network.
Preferences
The technical storage or access is necessary for the legitimate purpose of storing preferences that are not requested by the subscriber or user.
Statistics
The technical storage or access that is used exclusively for statistical purposes.The technical storage or access that is used exclusively for anonymous statistical purposes. Without a subpoena, voluntary compliance on the part of your Internet Service Provider, or additional records from a third party, information stored or retrieved for this purpose alone cannot usually be used to identify you.
Marketing
The technical storage or access is required to create user profiles to send advertising, or to track the user on a website or across several websites for similar marketing purposes.