Recently my Microsoft Teams Desktop app started showing the error code caad0009 and I was unable to use the Teams app from thereon. This a rare sign-in error which indicates the service could not validate your credentials or recognize your device. Although it occurs quite rarely, this error primarily affects work and school accounts and it only occurs on the Windows Desktop app, i.e. you can still use the Teams browser version, Teams mobile app, or even the Teams Desktop app on a totally different Windows device. I searched quite some time to finally resolve this issue with a simple Powershell command. All other solutions didn’t work for me.
The exact error message states:
Error code – caad0009 There’s a more permanent way to sign in to Microsoft Teams. If you’re having trouble completing the process, talk to your IT admin
Other solutions suggested things like
clearing the Windows Credentials cache
clearing the Teams Desktop app cache
re-installing Teams Desktop app
running Teams Desktop app in compatibility mode (e.g. Windows 7)
Someone even suggested that “it was a corrupt MicroSD card I had inserted couple of days a go, which prevented MS Teams and OneDrive from starting or signing in.” Hilarious, really!
It came all down to WAM (web Account Manager) and ADAL (Azure Active Directory Authentication Library). By running this little Powershell command in an elevated Windows Powershell shell the Teams Desktop app started working again like a charm:
In my case the command took almost an hour to complete and it simply stood there with a blinking cursor with nothing seemingly happening. I just kept it that way and all of a sudden it completed successfully. And after that Teams Desktop started working immediately without having to reboot my PC or anything.
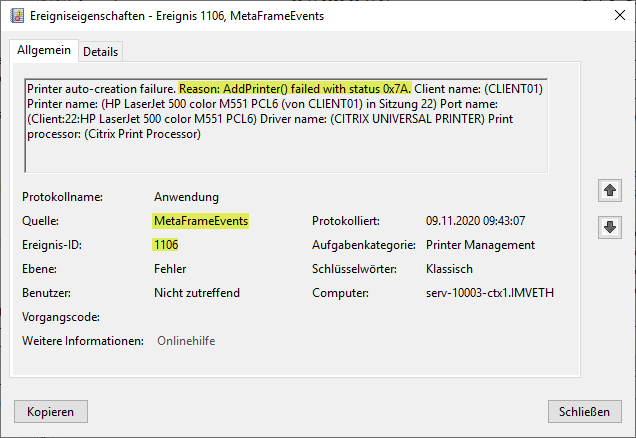
Today I came across an issue where printer auto creation failed for a couple of HP printers on one client computer only. The XenDesktop worker showed an Event ID 1106 stating Printer auto-creation failure. Reason: AddPrinter() failed with status 0x7A.
Searching for this particular error didn’t reveal anything helpful. So I had to start digging into it by myself.
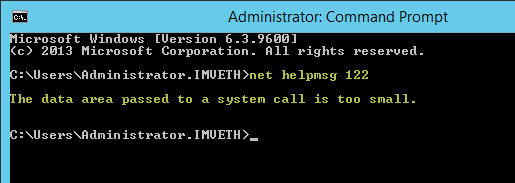
Converting hex 7A into decimal 122 and using net helpmsg122 does provide some additional information:
The data area passed to a system call is too small.
Searching for this error message revelead that there is an issue with the printer or the driver associated with it on the client. It looks like the printer drivers were not installed properly in the users PC. Re-installing the driver on the workstation solved the issue.
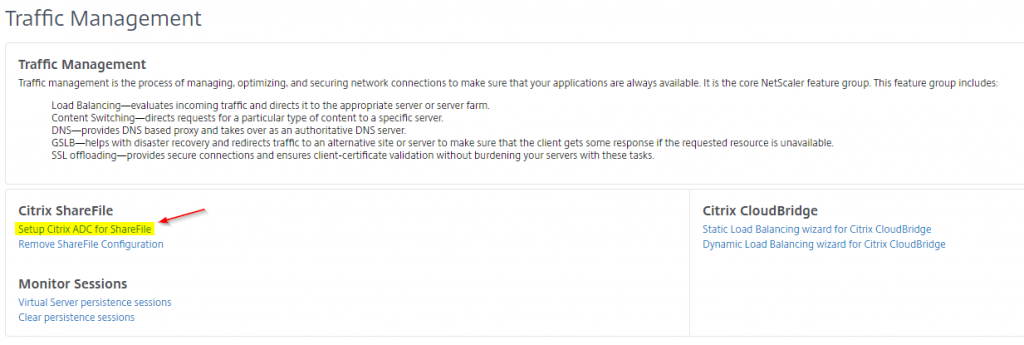
To help you set up NetScaler for ShareFile with on-premises storage zone controllers, an easy-to-use wizard is included in the GUI. The wizard prompts you for basic information about your StorageZones Controller environment and then generates a configuration that:
Load balances traffic across StorageZones Controllers
Provides user authentication for StorageZone Connectors
Validates URI signatures for ShareFile uploads and downloads
Terminates SSL connections at the NetScaler appliance
After running the built-in Setup Citrix ADC for ShareFile wizard, users starting complaining that they cannot access their network shares anymore. Those network shares have been provided via the integrated ShareFile Connector’s funcionality and has been up and running very smoothly prior to adding Netscaler to the equation.
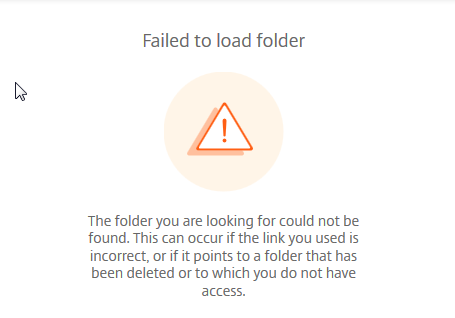
As soon as users tried to access a network share via a StorageZone Connector they received an error indicating “Failed to load folder -The folder you are looking for could not be found”:
As per Citrix, you may see following error while accessing Network Shares on ShareFile Web App:
The folder you are looking for could not be found. This can occur if the link you used is incorrect, or if it points to a folder that has been deleted or to which you do not have access.
Mind that this happened with the ShareFile Web App only while accessing network shares, i.e. using within a browser, whereas accessing the exact same network share via Citrix Files for iOS worked like a charm. After having consulted our change management documentation, it quickly became clear that only one culprit could remain, as there has been no change in user passwords, permissions, group memberships, UNC paths regarding the underlying network shares, et al. All users have required permissions. The root cause could only be traced back to the changes in the Netscaler configuration a couple of days earlier. So I started investigating the details of the Setup Citrix ADC for ShareFile wizard, its configuration changes and effects on my setup by reading ShareFile On-prem and NetScaler: A Comprehensive Configuration Guide & Deep Dive, amongst others:
In case you messed up with your ShareFile Configuration: you can try to remove it with Remove ShareFile Configuration
With having a better understanding of all things Netscaler & Sharefile, I did a little research and found a Citrix Discussion dealing with my issue and it turned out that the Setup Citrix ADC for ShareFile wizard (to the contrary) does not handle all the configuration required to access network shares via a StorageZone connector. Further configuration as to be done manually to make it work (again), as can be read here:
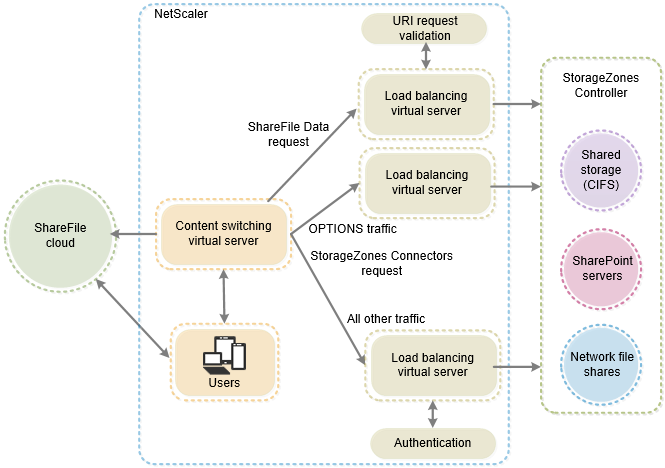
To support restricted zones or web access to StorageZone Connectors, you must perform additional NetScaler configuration after you complete the NetScaler for ShareFile wizard.
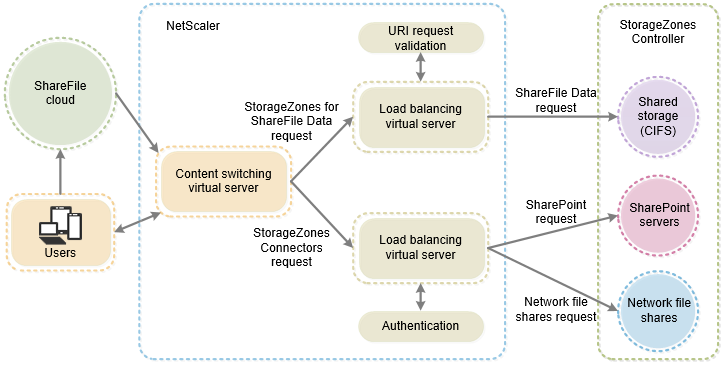
The additional configuration provides the Netscaler components shown in the following diagram:
The description of the additional configuration of Netscaler in Citrix Docs is – to say the least – not very accurate. Without appropriate formatting of the corresponding text passages and additional depictions illustrating every single configuration step, manual adjustments are difficult to comprehend for non-Netscaler-aficionados. Therefore I’d like to expand on Citrix Docs and provide a more elaborate description of the configuration steps required. So, what do we need to add to the existing Netscaler configuration:
a third NetScaler load-balancing virtual server
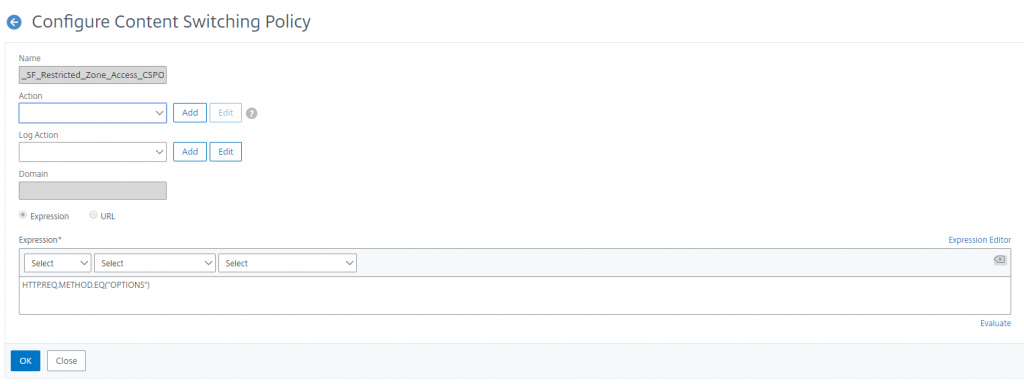
a third CS policy to allow anonymous access from clients for the HTTP OPTIONS verb
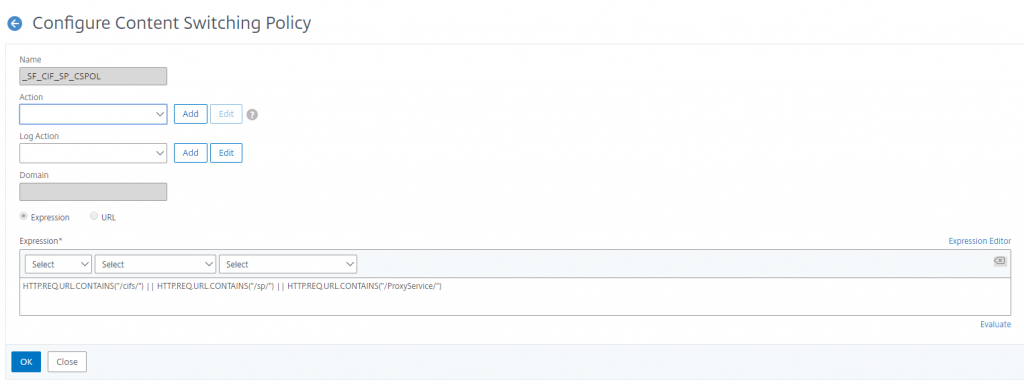
update the existing CS policy used for traffic to StorageZone Connectors (by default: _SF_CIF_SP_CSPOL)
update the existing CS policy used for traffic to StorageZones for ShareFile Data (by default: _SF_SZ_CSPOL)
create a heartbeat monitor for the StorageZones Controller service and bind it to the CS virtual server for ShareFile
verify the ShareFile Load Balancing configuration
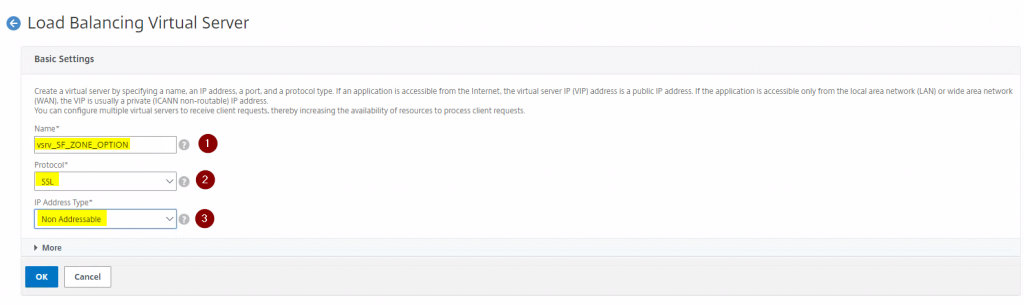
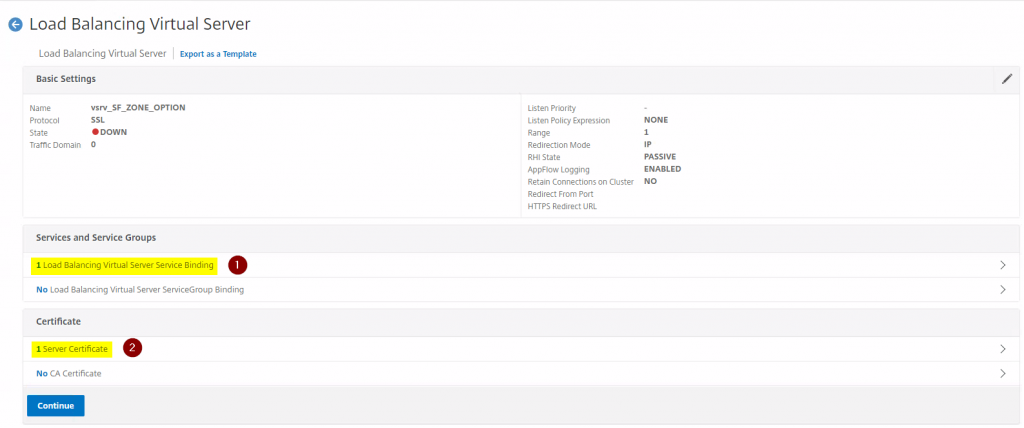
First, add a new Load Balancing vServer as follows:
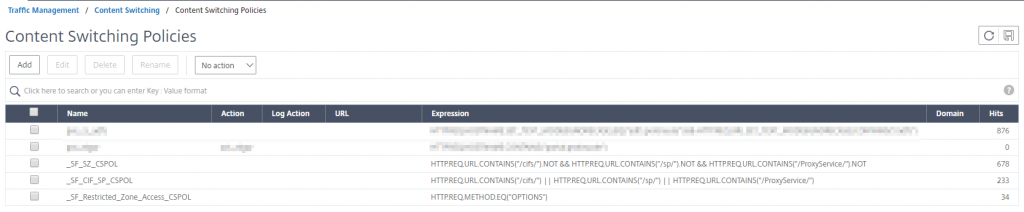
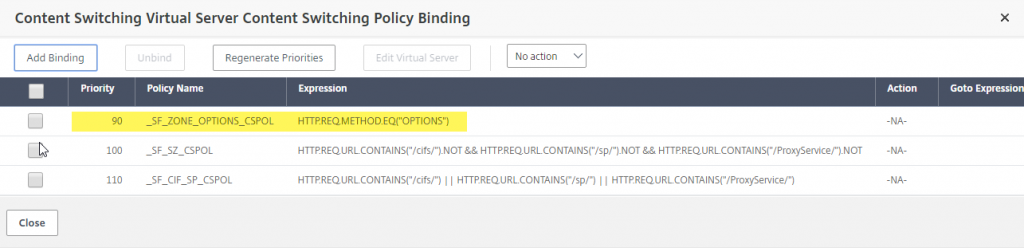
In the end your CS policies should look like this (in terms of Expressions):
final CS policies and corresponding Expressions
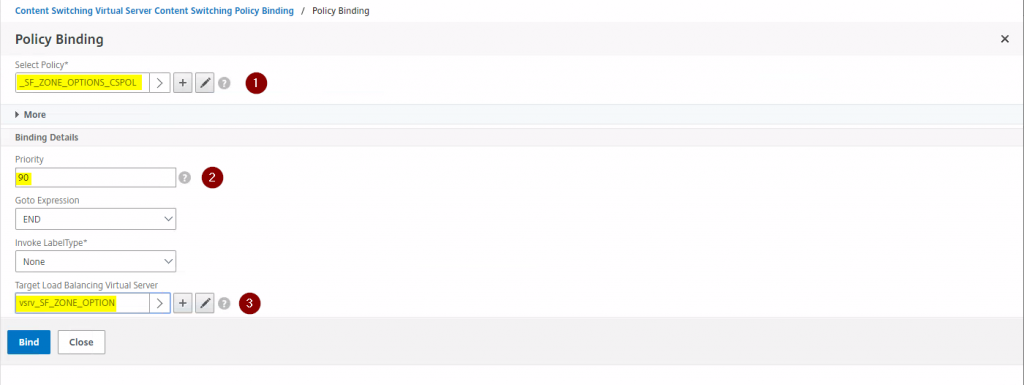
Now adjust the existing CS vServer for Sharefile (in my case vsrv_SF_CS_ShareFile) regarding its Policy Bindings in that you add the newly created CS Policy (in my case _SF_ZONE_OPTIONS_CSPOL) as the third CS policy with a Priority of 90 and set the Target Load Balancing Virtual Server to the newly created LB vServer (in my case vsrv_SF_ZONE_OPTION):
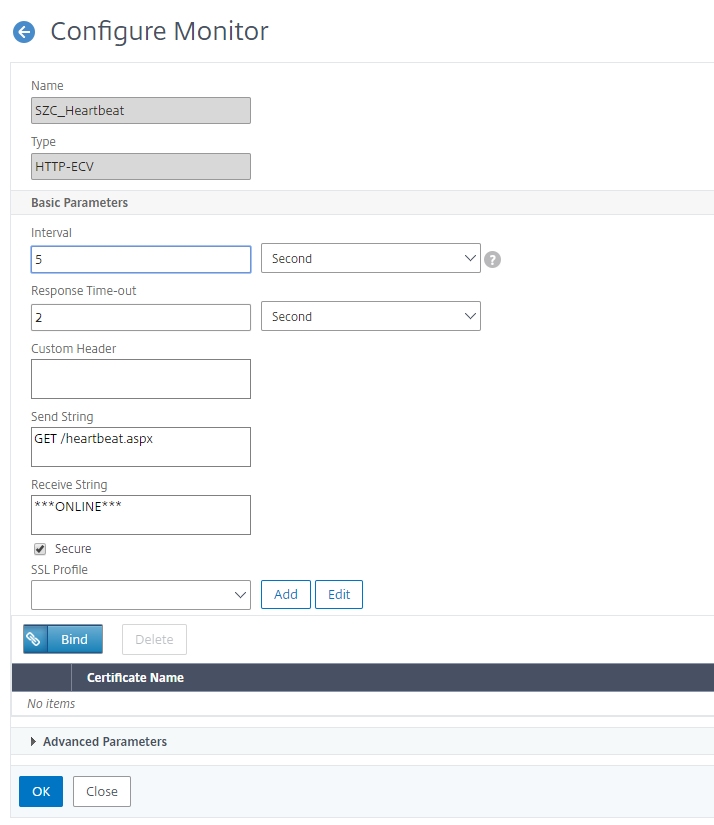
The StorageZone Hearbeat Monitor can be added using CLI by running the following commands:
add lb monitor SZC_Heartbeat HTTP-ECV -send "GET /heartbeat.aspx" -recv "***ONLINE***” -secure YES
bind service <Name of your LB service i.e. internal SF server> -monitorName SZC_Heartbeat
The newly added StorageZone Heartbeat Monitor should look as follows:
StorageZone Heartbeat Monitor Configuration
The complete CLI command list would look like this, whereas the following values need replacement according to your environment:
CertDisplayName (server certificate name you want to bind to your vServer)
NameOfYourSFServer (i.e. the Sharefile Server you’ve added to your NetScaler configuration)
NameOfYourSFCSvServer (i.e. the Sharefile Content Switching vServer)
Finally, go to Traffic Management > Load Balancing > Virtual Servers to view the status of the load balancing virtual servers created for ShareFile. It may look similar to my configuration:
Virtual Servers configured for ShareFile Load Balancing
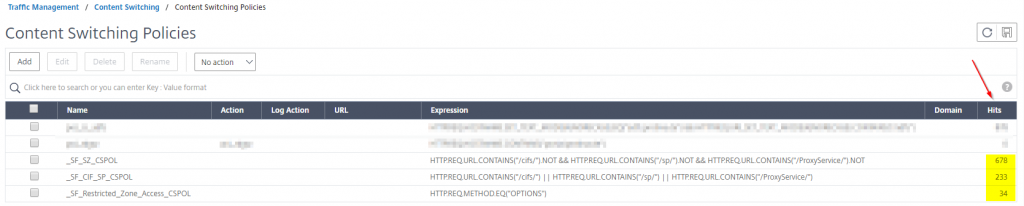
While testing your new configuration and accessing network shares via ShareFile connectors you should see an increasing hit number in the Hits column of your corresponding CS policies:
Increasing hit number in the Hits column
Update You have to consider network restrictions as well, as Security can mess with ShareFile traffic and network flow, especially when Firewall settings do not allow corresponding (read: whitelisted) traffic to ShareFile domains, endpoints, and IPs, i.e. the ShareFile Control Plane IP ranges. Have a look at CTX208318 and CTX234446.
In another case, if you attempt to access the ShareFile network share and it prompts for users credentials, the ShareFile Web App credentials may not work. Have a look at CTX233739 as well:
Solution Authentication settings of an IIS CIFS server on StorageZone Controller needs correction. Please follow the steps to resolve the issue:
1. Log onto the StorageZone Controller(s) and open IIS. 2. Expand Default web site 3. Click on the CIFS virtual directory, then on Authentication. 4. Ensure Anonymous is Enabled 5. ASP .NET Impersonation is Disabled 6. Basic Authentication is Enabled 7. Forms Authentication is Disabled 8. Windows Authentication is Disabled
Reference: The Authentication settings of an IIS CIFS server
I had quite some trouble installing and configuring AD FS 3.0 on a Windows Server 2012 R2 with a SQL Server 2005 Standard Edition server to store my Configuration DB in. Therefore I wanted to share that information, hoping it might be useful to others as well.
To provide the best experiences, we use technologies like cookies to store and/or access device information. Consenting to these technologies will allow us to process data such as browsing behavior or unique IDs on this site. Not consenting or withdrawing consent, may adversely affect certain features and functions.
Functional
Always active
The technical storage or access is strictly necessary for the legitimate purpose of enabling the use of a specific service explicitly requested by the subscriber or user, or for the sole purpose of carrying out the transmission of a communication over an electronic communications network.
Preferences
The technical storage or access is necessary for the legitimate purpose of storing preferences that are not requested by the subscriber or user.
Statistics
The technical storage or access that is used exclusively for statistical purposes.The technical storage or access that is used exclusively for anonymous statistical purposes. Without a subpoena, voluntary compliance on the part of your Internet Service Provider, or additional records from a third party, information stored or retrieved for this purpose alone cannot usually be used to identify you.
Marketing
The technical storage or access is required to create user profiles to send advertising, or to track the user on a website or across several websites for similar marketing purposes.