This short blog describes how to enable NetScaler 11’s Content Switching feature to proxy your AD FS infrastructure thus getting rid of a dedicated AD FS Proxy server.
Courtesy of Trond Eirik Haavarstein it was quite easy to enable NetScaler 11 to proxy my AD FS 3.0 implementation instead of a separate dedicated ADFS proxy. I scoured the Internet for ages to find a working guide regarding NetScaler and AD FS fronting. Finally, it’s here, and I’d like to further spread the word!
In order to successfully implement this solution the following requirements must be met (see HowTo – Install and Configure Microsoft Active Directory Federation Services 3.0 (ADFS 3.0) as well):
- Server Certificate
- Public IP Address
- DNS A-Record
- AD FS Service up and running
To understand how AD FS works, let’s look at what happens when a federated user tries to log into, say, Office 365 (or ShareFile):

- An end user tries to log into Office 365 using his user principal name (UPN).
- The authentication platform verifies the UPN and sees that the end user is a federated identity. It redirects the authentication request to the end user’s AD FS server. The Office 365 platform knows the URL because a trust was set up earlier between the AD FS infrastructure and Office 365.
- The client connects to the AD FS proxy (now represented by NetScaler’s Content Switching vServer) and provides credentials.
- The AD FS proxy (read: NetScaler) forwards the authentication request to the AD FS server.
- The AD FS server verifies the credentials with the local Active Directory.
- When the credentials are verified, a Domain Controller returns a Kerberos token to the AD FS server.
- The AD FS server disregards the Kerberos token and crafts a new AD FS token, which it forwards to the AD FS proxy server (read: NetScaler).
- The AD FS proxy server (read: NetScaler) forwards the AD FS token to the client.
- The client presents the AD FS token to Office 365, is authenticated, and logged in.
1. Server Certificate
…including the corresponding AD FS domain names (PFX file format, i.e. including Private Key, for the corresponding NetScaler Virtual Servers and required Subject Alternate Names (SAN)). I used the exact same Server certificate that’s implemented on my AD FS IIS server.
2. Public IP Address
…pointing to Netscaler’s Content Switching Virtual Server, by means of a corresponding firewall rule forwarding traffic on port 443 (https).
3. DNS A-Record
…e.g. adfs.domain.com, pointing to your Netscaler’s Content Switching Virtual Server, i.e. the aforementioned Public IP Address (keep in mind that the FQDN at least must match the Server Certificate’s Subject Alternate Name (SAN)).
4. AD FS Service
…running and working properly on the internal network, obviously.
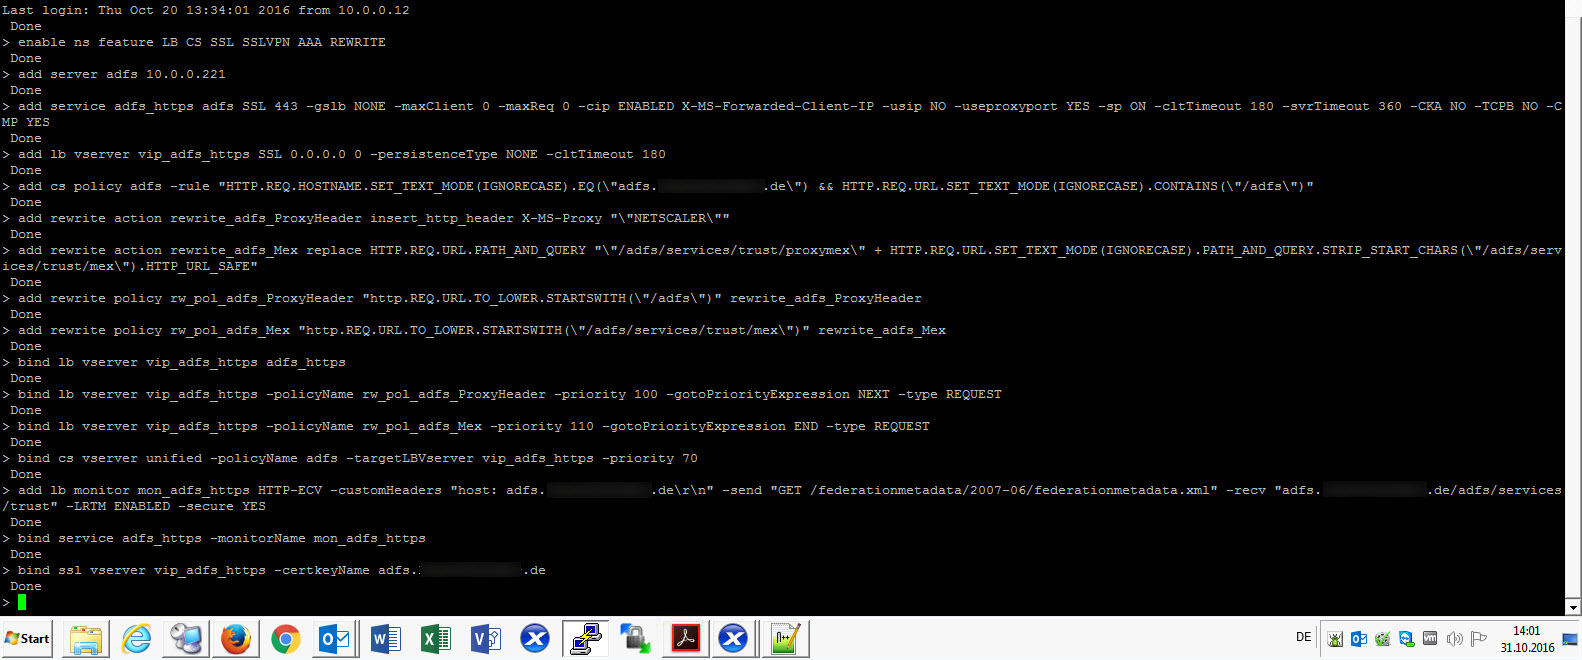
5. NetScaler Configuration
I have to agree that configuring NetScaler with CLI is much more easier and faster compared to using the GUI. I recommend getting to grips with to its CLI syntax as it’s like using PowerShell: fast, efficient, transparent. The following commands (borrowed from Trond and slightly adjusted for my purposes) should help you getting to know CLI:
You have to manually replace the following with your corresponding information:
- 10.0.0.221 with IP address of your internal AD FS server
- unified with the name of your NetScaler Content Switching vServer name
- adfs.domain.com with the FQDN of your external DNS A-Record (read: Subject Alternate Name)
- YourCertName with the Display Name of your Server Certificate
enable ns feature LB CS SSL SSLVPN AAA REWRITE
add server adfs 10.0.0.221
add service adfs_https adfs SSL 443 -gslb NONE -maxClient 0 -maxReq 0 -cip ENABLED X-MS-Forwarded-Client-IP -usip NO -useproxyport YES -sp ON -cltTimeout 180 -svrTimeout 360 -CKA NO -TCPB NO -CMP YES
add lb vserver vip_adfs_https SSL 0.0.0.0 0 -persistenceType NONE -cltTimeout 180
add cs policy adfs -rule "HTTP.REQ.HOSTNAME.SET_TEXT_MODE(IGNORECASE).EQ(\"adfs.domain.com\") && HTTP.REQ.URL.SET_TEXT_MODE(IGNORECASE).CONTAINS(\"/adfs\")"
add rewrite action rewrite_adfs_ProxyHeader insert_http_header X-MS-Proxy "\"NETSCALER\""
add rewrite action rewrite_adfs_Mex replace HTTP.REQ.URL.PATH_AND_QUERY "\"/adfs/services/trust/proxymex\" + HTTP.REQ.URL.SET_TEXT_MODE(IGNORECASE).PATH_AND_QUERY.STRIP_START_CHARS(\"/adfs/services/trust/mex\").HTTP_URL_SAFE"
add rewrite policy rw_pol_adfs_ProxyHeader "http.REQ.URL.TO_LOWER.STARTSWITH(\"/adfs\")" rewrite_adfs_ProxyHeader
add rewrite policy rw_pol_adfs_Mex "http.REQ.URL.TO_LOWER.STARTSWITH(\"/adfs/services/trust/mex\")" rewrite_adfs_Mex
bind lb vserver vip_adfs_https adfs_https
bind lb vserver vip_adfs_https -policyName rw_pol_adfs_ProxyHeader -priority 100 -gotoPriorityExpression NEXT -type REQUEST
bind lb vserver vip_adfs_https -policyName rw_pol_adfs_Mex -priority 110 -gotoPriorityExpression END -type REQUEST
bind cs vserver unified -policyName adfs -targetLBVserver vip_adfs_https -priority 70
add lb monitor mon_adfs_https HTTP-ECV -customHeaders "host: adfs.domain.com\r\n" -send "GET /federationmetadata/2007-06/federationmetadata.xml" -recv "adfs.lauterfresser.de/adfs/services/trust" -LRTM ENABLED -secure YES
bind service adfs_https -monitorName mon_adfs_https
set ssl vserver vip_adfs_https -SNIEnable ENABLED
bind ssl vserver vip_adfs_https -certkeyName YourCertName
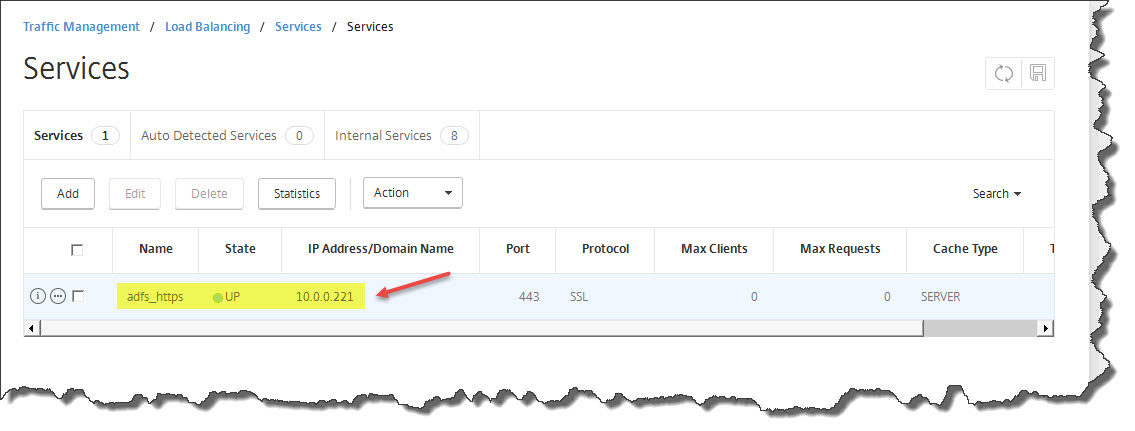
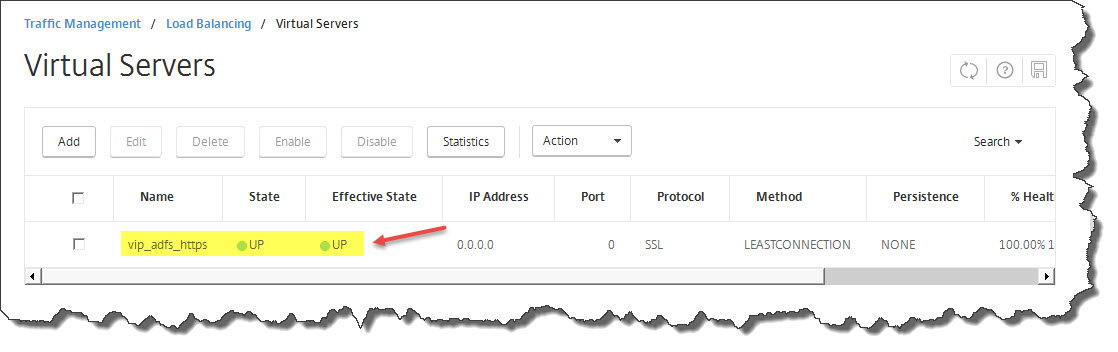
Verify that everything’s working as expected:

Finally, you could navigate to your newly added AD FS URL and check whether AD FS is working properly (see HowTo – Install and Configure Microsoft Active Directory Federation Services 3.0 (ADFS 3.0) as well).
Once again: many thanks, Trond! Awesome work!
Further reading:
- Setup NetScaler as ADFS Proxy
- Netscaler as ADFS Proxy
- Guide to Deploying NetScaler as an Active Directory Federation Services Proxy [PDF]
- Citrix Blogs – ADFS v3 on Windows Server 2012 R2 with NetScaler
- YouTube – ADFS & Citrix NetScaler: The Practical Guide – Part 1 Overview Certificates and Installation
- Use Citrix Netscaler as a replacement for ADFS Proxy
- Load balance ADFS 3.0 using Netscaler