Another Exchange 2016 migration, another error while trying to migrate custom Receiver Connectors from Exchange 2010 to 2016 … an analysis.

Helping making IT safer for everyone
Another Exchange 2016 migration, another error while trying to migrate custom Receiver Connectors from Exchange 2010 to 2016 … an analysis.
While migrating from Microsoft Exchange 2010 to Exchange 2016 we came upon a typical issue in which Outlook keeps giving the message: “The Microsoft Exchange Administrator has made a change that requires you quit and restart Outlook“.
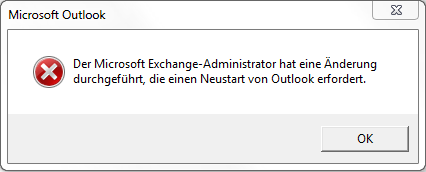

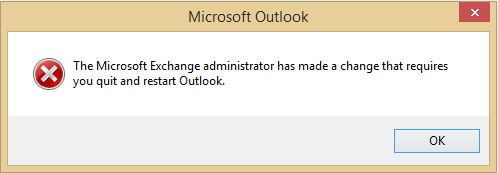
This means that users were totally unable to connect to Exchange during the migration and co-existence phase:
![]()
The reason for that was quite obvious (at least after we did some research and thinking) as we switched the Client Access from the old Exchange 2010 servers to the newly implemented Exchange 2016 servers, i.e. all client connections have been directed to Exchange 2016 only. As no mailboxes have been migrated at this point in time client connections need then to be down proxied to Exchange 2010 by Exchange 2016. All things considered it could only have been a question of the protocol being used by our Outlook 2010 clients. Assuming that our Outlook 2010 clients try to connect via RPC-over-TCP (as is the default setting configured in all internal Outlook 2010 profiles) this is an expected behaviour as Exchange 2013 and later no longer support RPC-over-TCP connections from client applications. They only support RPC-over-HTTP, in later versions MAPI-over-HTTP (MAPIhttp). An automatic switch in protocol to RPC-over-HTTP does not occur, thus Outlook 2010 won’t find a valid connection end point and cannot be down proxied to Exchange 2010. The importance of this consideration is that if Outlook clients are using RPC-over-TCP prior to being migrated, it becomes even more important to have a process to update those profiles properly.
Required Outlook 2010 version:
- Outlook 2010 SP2
- Outlook 2010 (KB2878264)
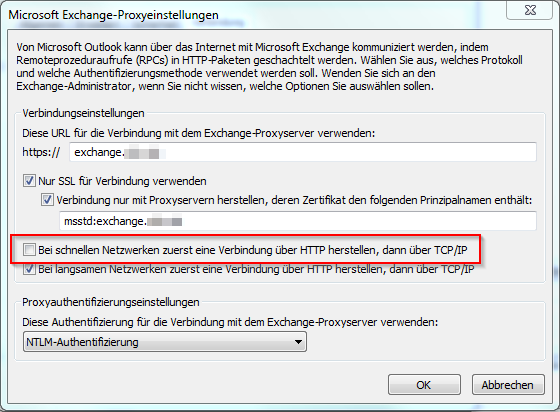
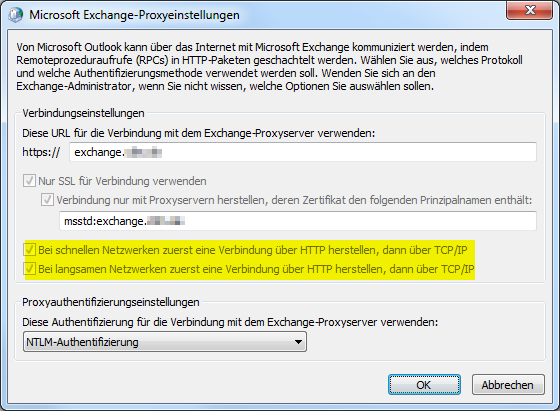
In an Outlook profile under Exchange Proxy Settings you’ll find two options regarding fast and slow networks:
In order to understand what this setting really means have a look at the article Outlook Anywhere: Fast vs. Slow network connection over HTTP or TCP/IP:
Outlook Anywhere; Emphasis on “Anywhere”
First of all, lets take a closer look at the terms being used here:
- TCP/IP connection
This is the traditional (internal) direct-to-Exchange connection also known as a “RPC over TCP” connection or as a (not entirely technical correct) MAPI connection.- HTTP or HTTPS connection
This is the over-the-Internet connection introduced in Outlook 2003 also known as a “RPC over HTTP” connection and nowadays knows as “Outlook Anywhere”.
As of Outlook 2013 SP1 in combination with Exchange 2013 SP1, this is a MAPI over HTTP connection or simply: MAPI/HTTP.The description for the HTTP connection doesn’t really hold true anymore as the HTTP connection can also be used internally. In fact, over the past few Exchange versions, the trend was to move away from the direct RCP connections and towards HTTP connections, even internally. Actually, as of Exchange 2013, all Outlook connectivity is taking place via Outlook Anywhere.
So, with having the option On fast networks, connect using HTTP first, then connect using TCP/IP being disabled we receive the aforementioned error:
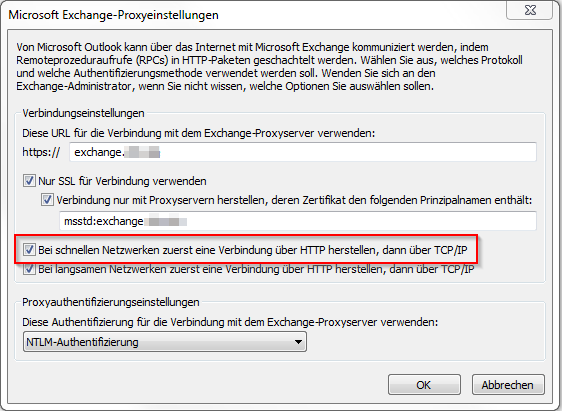
With having the option On fast networks, connect using HTTP first, then connect using TCP/IP being enabled the connection can be established successfully:
Now, in order to rollout such a configuration change on a large scale (after careful testing of course!) you could utilize GPOs by either configuring the corresponding Outlook setting or by using GPP and manipulating the user’s registry settings directly.
The required Group Policy Setting can be found in the corresponding Microsoft Office ADMX Templates under:
Please keep in mind that this setting is unavailable with Office 2010 ADMX.

Alternatively you could add the setting manually via GPP (Group Policy Preferences) under:
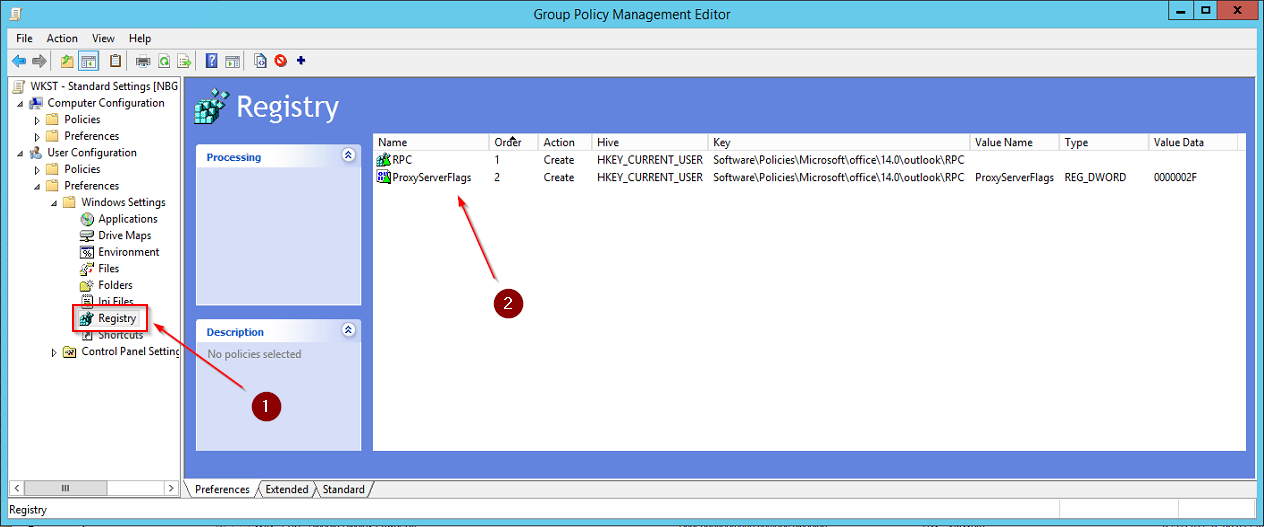
This XML based code looks like this:
<?xml version="1.0" encoding="UTF-8"?>
<Registry uid="{ADF10FBF-F683-4549-A19E-885D5A58D23E}" changed="2018-11-26 11:04:59" image="0" status="RPC" name="RPC" clsid="{9CD4B2F4-923D-47f5-A062-E897DD1DAD50}">
<Properties name="" value="" type="REG_SZ" key="Software\Policies\Microsoft\office\14.0\outlook\RPC" hive="HKEY_CURRENT_USER" default="0" displayDecimal="1" action="C"/>
</Registry>
<?xml version="1.0" encoding="UTF-8"?>
<Registry uid="{0C4FA337-45F4-4A16-965F-48155F45186F}" changed="2018-11-26 11:05:56" image="10" status="ProxyServerFlags" name="ProxyServerFlags" clsid="{9CD4B2F4-923D-47f5-A062-E897DD1DAD50}">
<Properties name="ProxyServerFlags" value="0000002F" type="REG_DWORD" key="Software\Policies\Microsoft\office\14.0\outlook\RPC" hive="HKEY_CURRENT_USER" default="0" displayDecimal="1" action="C"/>
</Registry>
Windows Registry Editor Version 5.00

[HKEY_CURRENT_USER\Software\Policies\Microsoft\office\14.0\outlook\rpc]
"ProxyServerFlags"=dword:0000002f
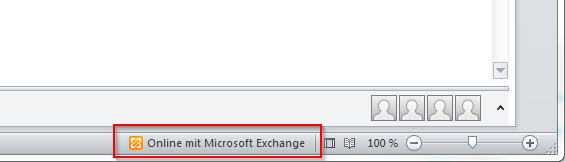
With having the option On fast networks, connect using HTTP first, then connect using TCP/IP being enabled by GPO or GPP, the settings are greyed out, cannot be changed by the user, and the connection can be established successfully:
The Outlook Connection Status now shows: RPC/HTTP
![]()
Prior to switching Client Access from Exchange 2010 to Exchange 2016 all Outlook 2010 clients connected via RPC-over-TCP, which shows as: RPC/TCP
![]()
With this configuration adjustment we were able to proceed with the Exchange 2016 migration without having any Outlook 2010 connectivity issues.
Further reading:
As part of my Security Best Practices regarding Microsoft Exchange and Microsoft IIS I always implement a couple of configuration settings to harden the underlying IIS, e.g.
In order to tighten your security on Exchange 2016’s IIS you should at least start with enabling HTTP Strict Transport Security (HSTS) which I’m going to describe here. As per Microsoft:
HTTP Strict Transport Security (HSTS), specified in RFC 6797, allows a website to declare itself as a secure host and to inform browsers that it should be contacted only through HTTPS connections. HSTS is an opt-in security enhancement that enforces HTTPS and significantly reduces the ability of man-in-the-middle type attacks to intercept requests and responses between servers and clients.
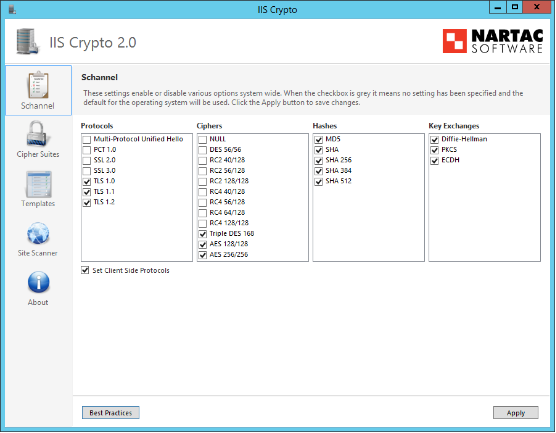
There are a couple of recommendations and Best Practices available that give further information on how to harden Windows Server 2012 R2/2016 as well as Exchange 2013/2016, respectively. In this article I will focus on HSTS only as I didn’t find any particular articles outlining this issue […]. Please check the Further reading section at the bottom of thids article for more information, e.g. IIS Crypto by Nartac Software:
IIS Crypto is a free tool that gives administrators the ability to enable or disable protocols, ciphers, hashes and key exchange algorithms on Windows Server 2008, 2012 and 2016. It also lets you reorder SSL/TLS cipher suites offered by IIS, implement best practices with a single click, create custom templates and test your website.
You could always have a look at Center for Internet Security’s (CIS) Benchmark Documents as well, e .g. for Microsoft Exchange Server 2016, which provides a “prescriptive guidance for establishing a secure configuration posture for Microsoft Exchange Server 2016” and “was tested against Microsoft Exchange Server 2016.”
Windows Server 2012 R2 (IIS 8.5)
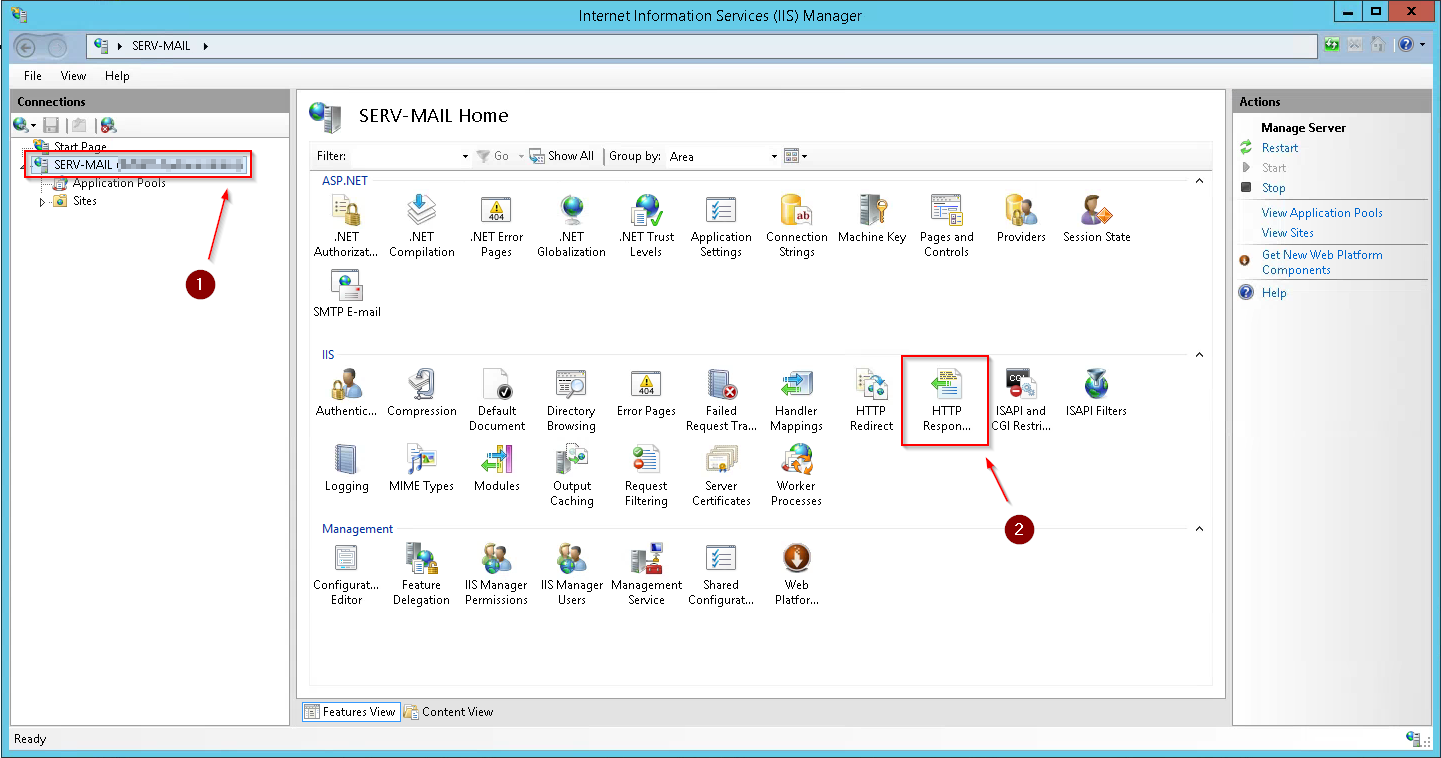
1. Open the Internet Information Services (IIS) Manager console, and click your server. Then click HTTP Response Headers in the IIS section of the middle pane:
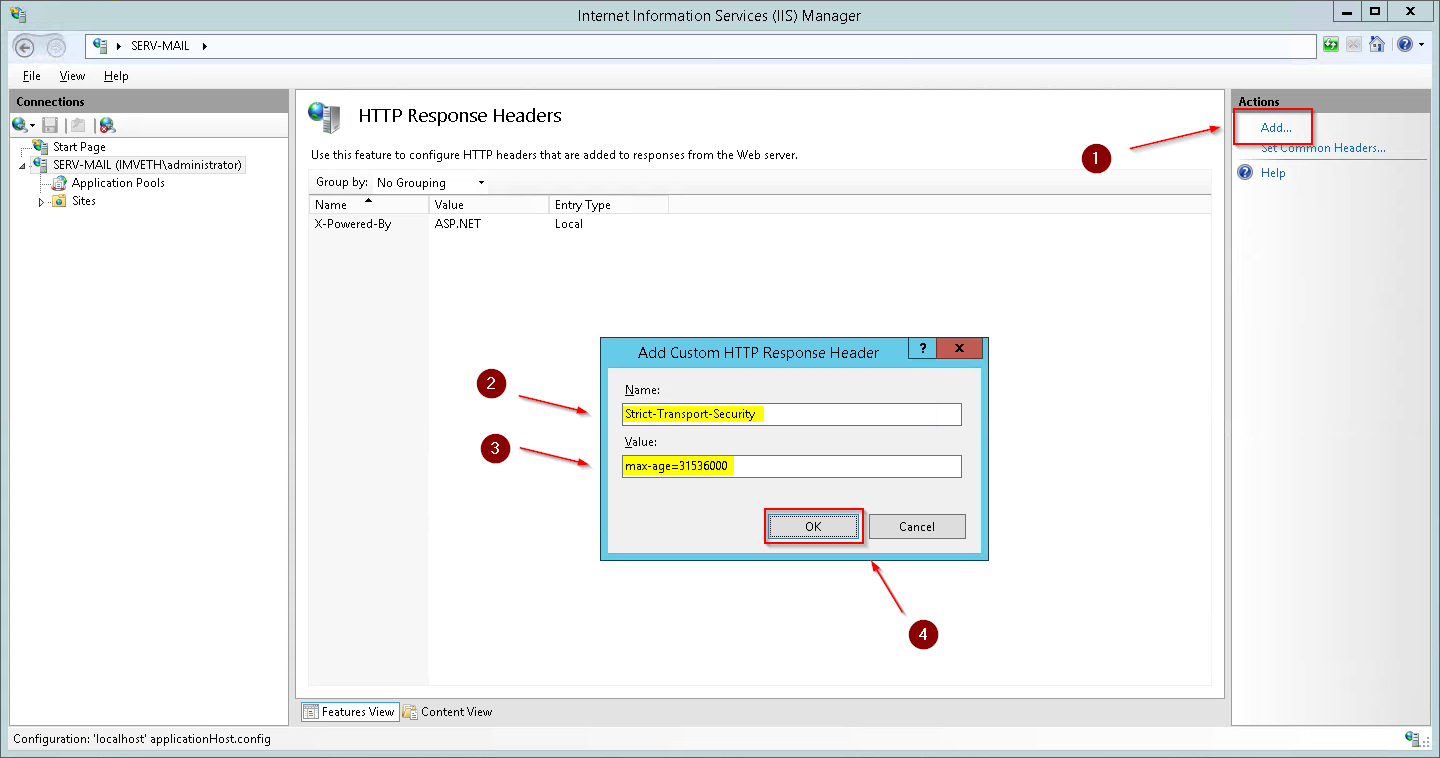
2. Click Add in the Actions pane on the right, enter the following values in the Add Custom HTTP Response Header dialogue window, then click OK:
- Name: Strict-Transport-Security
- Value: max-age=31536000
3. The newly added Custom HTTP Response Header will be added to the list of configured HTTP Response Headers in the middle pane:
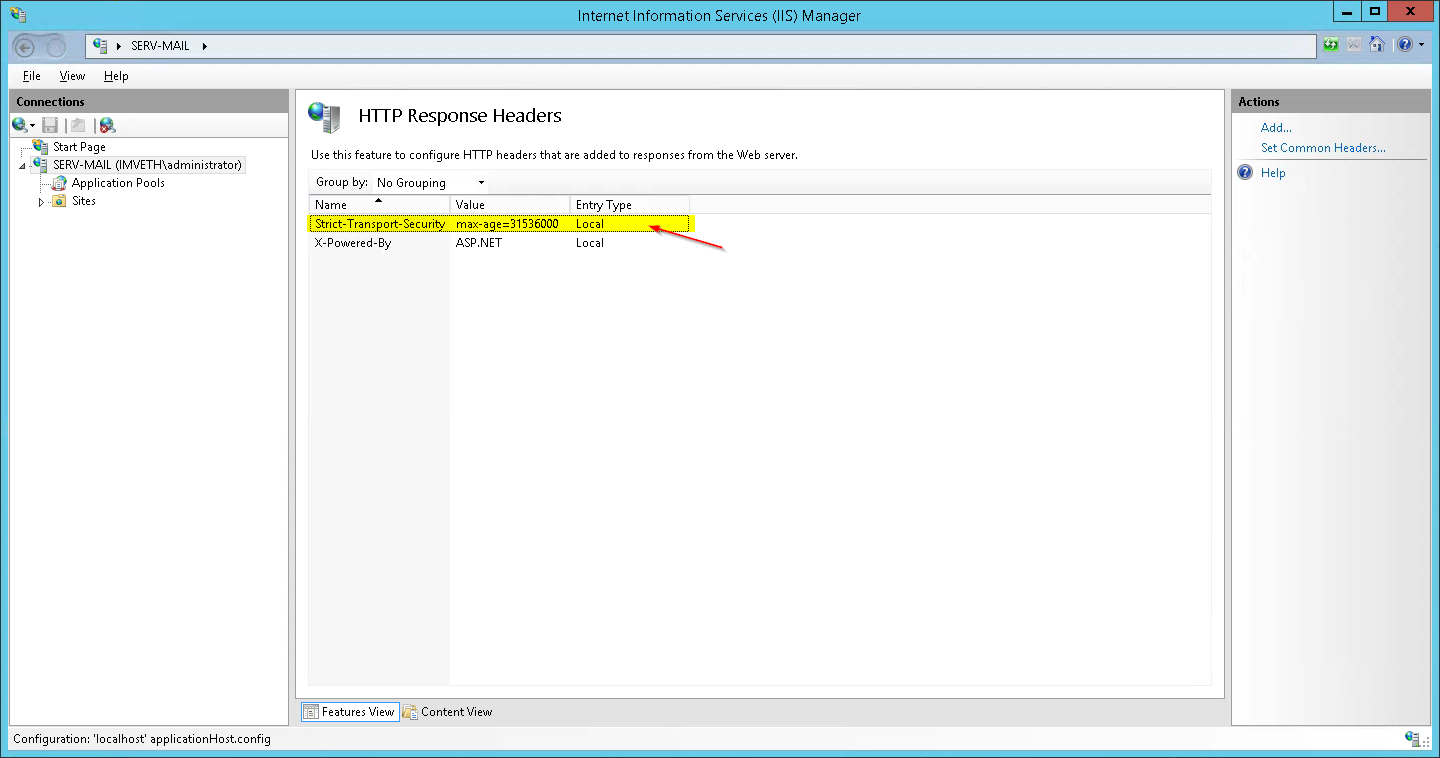
4. The new setting will become effective immediately. You don’t have to iisreset your Exchange server.
Windows Server 2016 (IIS 10)
With IIS 10.0 version 1709 onwards Microsoft has implemented native HSTS support. Have a look at IIS 10.0 Version 1709 Native HSTS Support on how to configure HSTS in Windows Server 2016 version 1709+ via Powershell:
Import-Module IISAdministration
Reset-IISServerManager -Confirm:$false
Start-IISCommitDelay

$sitesCollection = Get-IISConfigSection -SectionPath "system.applicationHost/sites" | Get-IISConfigCollection
$siteElement = Get-IISConfigCollectionElement -ConfigCollection $sitesCollection -ConfigAttribute @{"name"="Contoso"}
$hstsElement = Get-IISConfigElement -ConfigElement $siteElement -ChildElementName "hsts"
Set-IISConfigAttributeValue -ConfigElement $hstsElement -AttributeName "enabled" -AttributeValue $true
Set-IISConfigAttributeValue -ConfigElement $hstsElement -AttributeName "max-age" -AttributeValue 31536000
Set-IISConfigAttributeValue -ConfigElement $hstsElement -AttributeName "redirectHttpToHttps" -AttributeValue $true

Stop-IISCommitDelay
Remove-Module IISAdministration
The new setting will become effective immediately. You don’t have to iisreset your Exchange server.
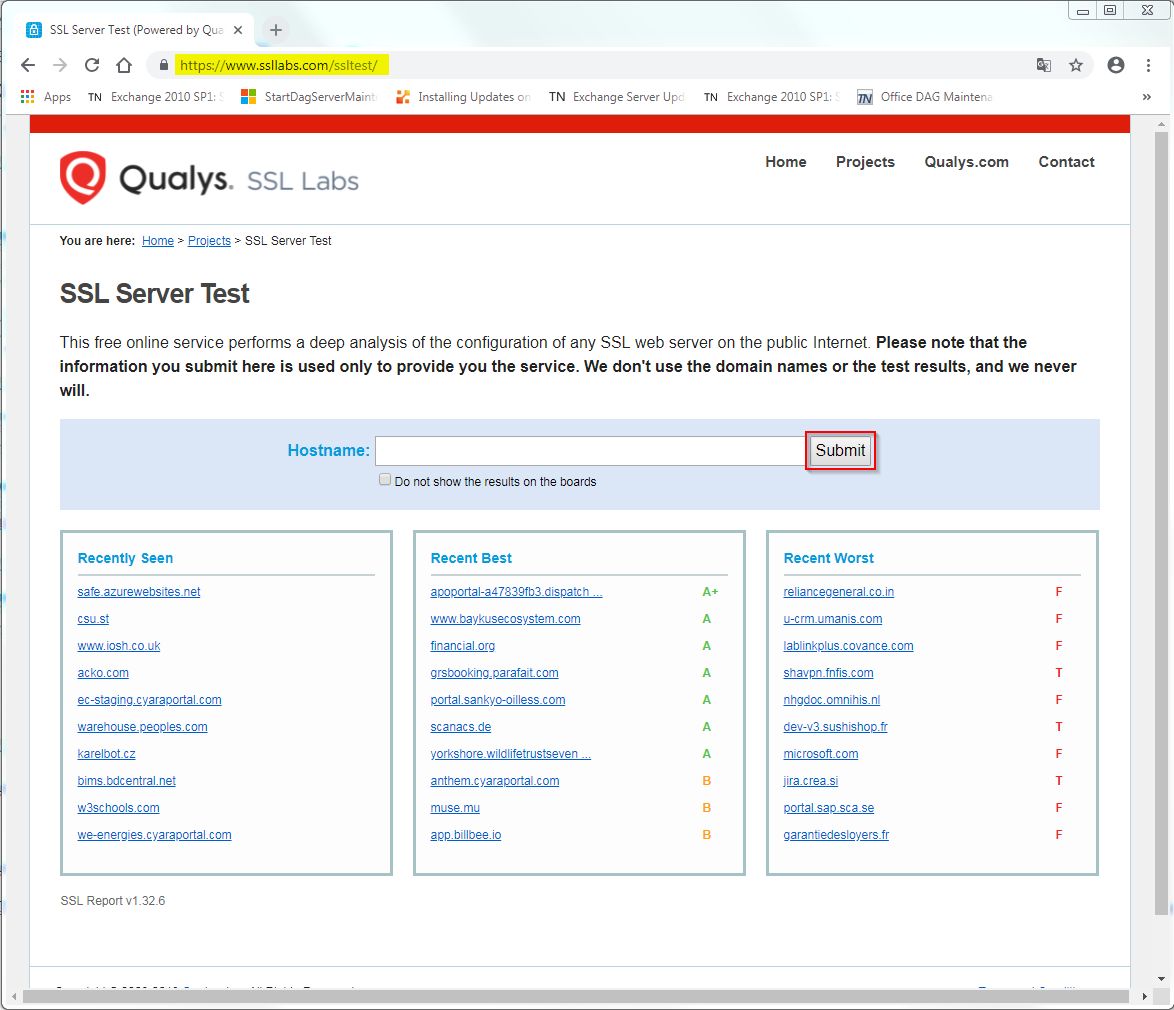
Verification
You can check whether HSTS has been successfully implemented by browsing to SSLLabs’ SSL Server Test page and enter the server’s corresponding hostname (in case it is publicly resolvable and directly reachable from the internet, which often is the case with SMBs):

That’s it! You have successfully enabled HSTS.
Further reading:
Citrix XenDesktop 7.x – Citrix Session Printers are not visible via Control Panel, Devices And Printers
Affected System: Windows Server 2012 R2 as well as Windows Server 2016
Citrix Environment: XenDesktop 7.15 LTSR CU2
Citrix NetScaler – Firmware Upgrade using CLI
Upgrade methodology
Requirements
As per Citrix:
Warning! Any customization within NetScaler or NetScaler Gateway might cause unexpected behavior during and after the upgrade or the downgrade process, and possible configuration loss. Any sort of customization within NetScaler or NetScaler Gateway should be backed up and removed before the upgrade or the downgrade process.
How to backup a existing NetScaler configuration
See my other blog entry on automated NetScaler backups:
Upgrade firmware via CLI
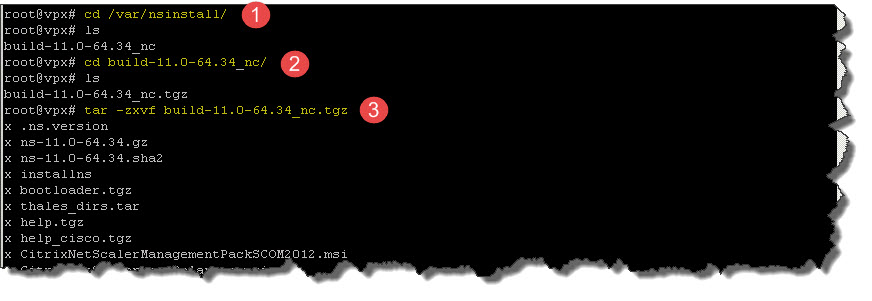
Before you run the install script, the files must be extracted and placed on the appliance. Use the following command to uncompress the bundle located, for instance, in /var/nsinstall/build-11.0-64.34_nc/:
tar -zxvf <archive_filename>.tgz
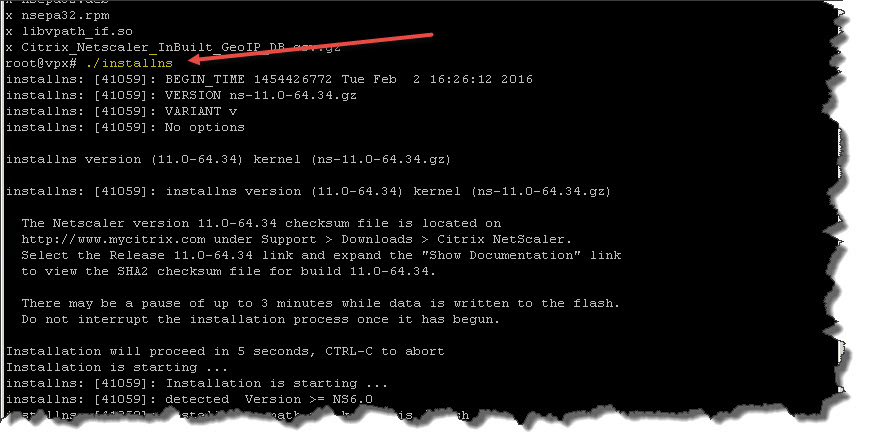
The run the following command to initiate the upgrade process:
./installns
root@ns# ./installns
installns: [78217]: BEGIN_TIME 1444030959 Mon Oct 5 09:42:39 2015
installns: [78217]: VERSION ns-11.0-62.10.gz
installns: [78217]: VARIANT v
installns: [78217]: No optionsinstallns version (11.0-62.10) kernel (ns-11.0-62.10.gz)
installns: [78217]: installns version (11.0-62.10) kernel (ns-11.0-62.10.gz)
The Netscaler version 11.0-62.10 checksum file is located on
http://www.mycitrix.com under Support > Downloads > Citrix NetScaler.
Select the Release 11.0-62.10 link and expand the “Show Documentation” link
to view the SHA2 checksum file for build 11.0-62.10.There may be a pause of up to 3 minutes while data is written to the flash.
Do not interrupt the installation process once it has begun.Installation will proceed in 5 seconds, CTRL-C to abort
Installation is starting …
installns: [78217]: Installation is starting …
installns: [78217]: detected Version >= NS6.0
installns: [78217]: Installation path for kernel is /flashCallHome feature is currently disabled. Enabling this feature lets this
NetScaler device/instance automatically alert Citrix support on detecting
critical errors and/or potential failures, before it impacts your network.
You can also configure this feature anytime using the command line interface
(“enable feature callhome”) or the configuration utility. Please see the
documentation for further details.
Do you want to enable it NOW? [Y/N] Ninstallns: [78336]: Size of kernel ns-11.0-62.10.gz is 130936 kilobytes
installns: [78336]: Available space on /flash/ filesystem is 842440 kilobytes
installns: [78336]: Available space on /var is 7626642 kilobytes
installns: [78336]: Checking directories …
installns: [78336]: Checksumming ns-11.0-62.10.gz …
installns: [78336]: Checksum ok.
Copying ns-11.0-62.10.gz to /flash/ns-11.0-62.10.gz …
installns: [78336]: Copying ns-11.0-62.10.gz to /flash/ns-11.0-62.10.gz …
installns: [78336]: BEGIN KERNEL_COPY
…………….
installns: [78336]: END KERNEL_COPY
installns: [78336]: Changing /flash/boot/loader.conf for ns-11.0-62.10 …Installing XML API documentation…
installns: [78336]: Installing XML API documentation…
Installing NSConfig.wsdl…
installns: [78336]: Installing NSConfig.wsdl…
Installing NSStat.wsdl…
installns: [78336]: Installing NSStat.wsdl…
Installing online help…
installns: [78336]: Installing online help…
Installing Cisco online help…
installns: [78336]: Installing Cisco online help…
Installing Logon Point …
installns: [78336]: Installing Logon Point …
Couldnt execute eula_upgrade.pl error: 6400
installns: [78336]: Couldnt execute eula_upgrade.pl error: 6400
Installing Login Schema files …
installns: [78336]: Installing Login Schema files …
Installing SCOM Management Pack…
installns: [78336]: Installing SCOM Management Pack…
Installing LoadBalancer Pack…
installns: [78336]: Installing LoadBalancer Pack…
Installing GUI…
installns: [78336]: Installing GUI…
Installing EPA Package …
installns: [78336]: Installing EPA Package …
Installing Mac EPA and Mac EPA version file…
Installing Linux EPA and Linux EPA version file…installns: [78336]: Installing Linux EPA and Linux EPA version file…
Installing NITRO…
installns: [78336]: Installing NITRO…
Installing Debian, RPM packages …
installns: [78336]: Installing Debian, RPM packages …
Installing Jazz certificate …
installns: [78336]: Installing Jazz certificate …
Installing Call Home certificate …
installns: [78336]: Installing Call Home certificate …
Installing Upload server certificate …
installns: [78336]: Installing Upload server certificate …
/var/opt/nfast directory exists. Extracting hardserver files.
installns: [78336]: /var/opt/nfast directory exists. Extracting hardserver files.
Creating before PE start upgrade script …
installns: [78336]: Creating before PE start upgrade script …
Creating after upgrade script …
installns: [78336]: Creating after upgrade script …
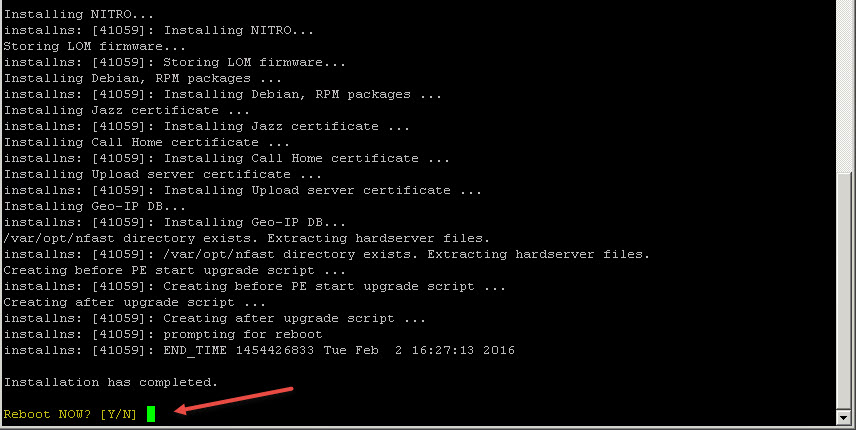
installns: [78336]: prompting for reboot
installns: [78336]: END_TIME 1444031171 Mon Oct 5 09:46:11 2015Installation has completed.
Reboot NOW? [Y/N] Y
After the upgrade has been successfully completed simply reboot your NetScaler by entering Y and pressing <Enter>. After abouot 90 seconds the NetScaler will be back online and accessible through your browser. Log back in and verify whether the upgrade has been completed successfully by checking your firmware version and license status:

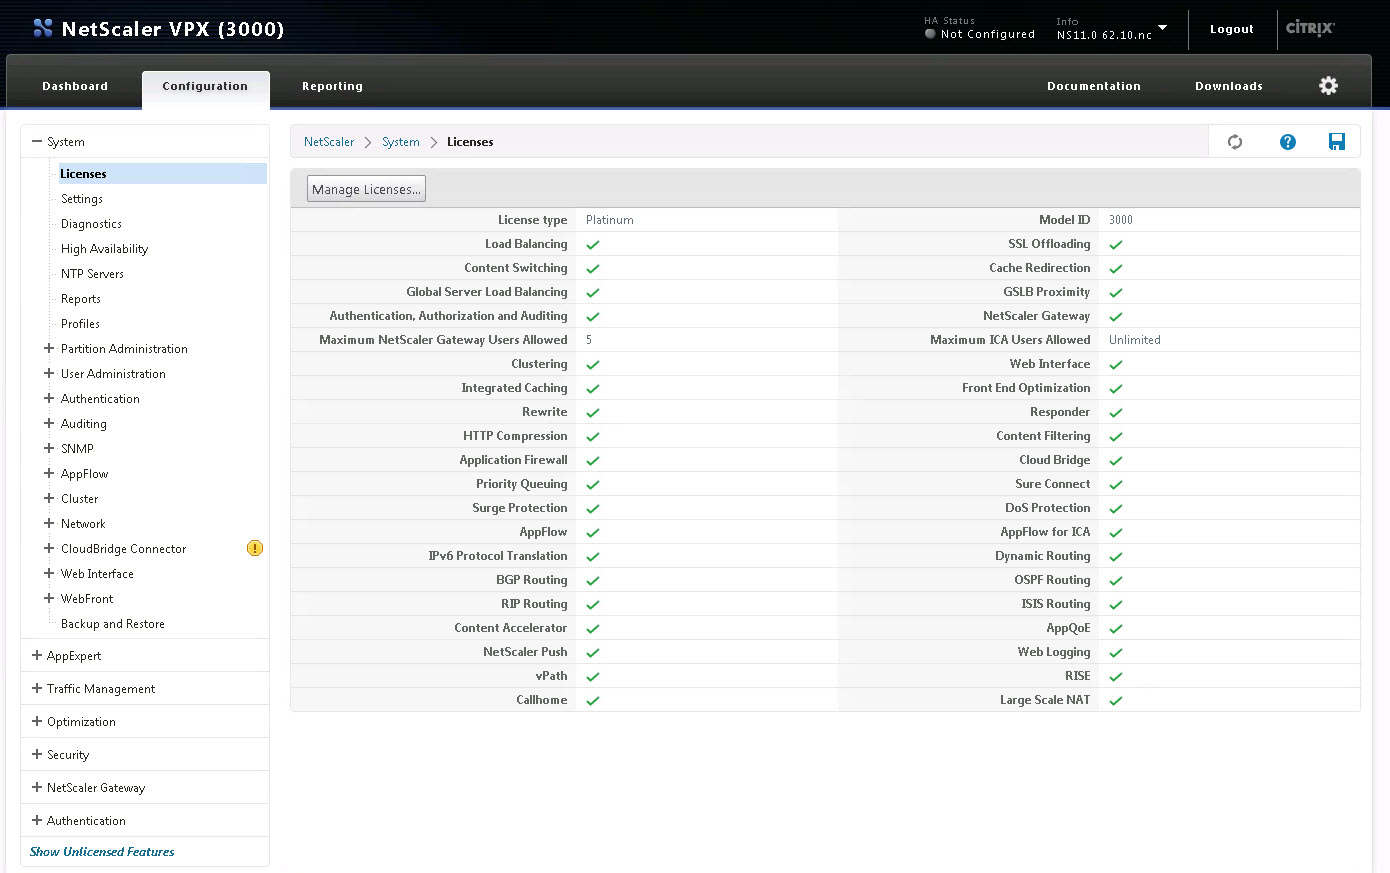
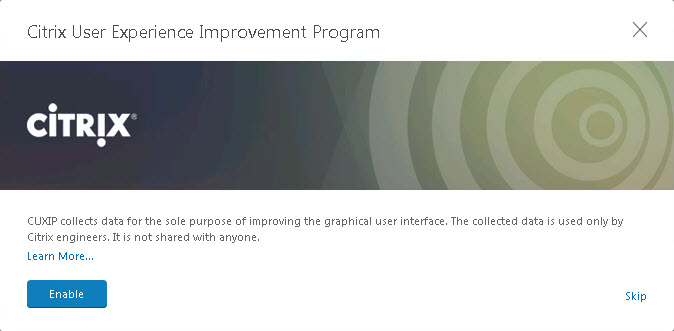
In case you get bogged by the newly added feature called CUXIP (Citrix User Experience Improvement Program), you’re free to chose whether you want to enable it or not.
After that verify the NetScaler Gateway’s functionality by logging in to your vServer’s public Gateway and launching any published resources.
Further reading:
Just recently I ran into an error during initial setup of Exchange 2016 on a newly installed Windows Server 2012 R2 stating: “Service ‘MpsSvc’ failed to reach status ‘Running’ on this server“. Further down the troubleshooting road I found out that this quite common error of not being able to start the Windows Firewall service is not Exchange Server specific.
As I did quite some Exchange migrations (including single as well as multi tenancy environments) I was always wondering whether there are any additional post migration tasks that need to be addressed before you start removing your legacy Exchange server(s) from your organization. For instance, as with migrating from Exchange 2003 to, say, Exchange 2010 you had to update Global Address Lists, Address Lists, Offline Address Books, et al to the new Exchange 2010 version by executing the corresponding cmdlts, e.g. Move-OfflineAddressBook. Now when migrating from Exchange 2010 to Exchange 2016 (or even just from Exchange 2013 to Exchange 2016 with both having an almost identical architecture) what remains of those post migration tasks? Which ones are a necessity? What kind of architectural changes require you to think different and adjust certain settings prior to removing your legacy Exchange server(s)?
By talking about post migration tasks, what do I mean? Well, after you’ve successfully migrated all your databases, mailboxes, public folders, send/receive connectors, et al, what’s still left? Maybe the not so obvious parts of your Exchange infrastructure that need addressing as well in order to avoid any unwanted behaviors and/or errors after you removed the last legacy Exchange server from your organization.

Just recently I was tasked to identify all Citrix Receiver Versions connecting to a Citrix XenDesktop 7.x environment.
For starters, to get information on current sessions issue the following PowerShell cmdlets on your Citrix Broker Server:
Add-PSSnapin *Citrix*
Get-BrokerSession | Select MachineName,UserName,ClientPlatform,ClientVersion,*Protocol* | Out-GridView

To get hands on every single information of your current Broker Sessions simply run:
Get-BrokerSession | Out-GridView
Now, in terms of historical session and connection information you have to query the OData API (http://<ServerBrokerFQDN>/Citrix/Monitor/OData/v2/Data), as with the Get-BrokerSession cmdlet you only get information on current sessions. So in case you’re looking for historical reports and data, which you cannot find in the Director Web UI, you could simply create a custom report with Microsoft Excel by connecting to the Data Feed.
This leaves me with recommending the following Citrix Blog Article, that explains how to
The result might look something like this:
You can then tinker with the different tables available through the Data Feed in order to achieve the resultant data set required for your purpose. As opposed to the aforementioned Citrix Blog you could select the following tables to even get information on Citrix Receiver Versions, Client Names, and corresponding User Names:
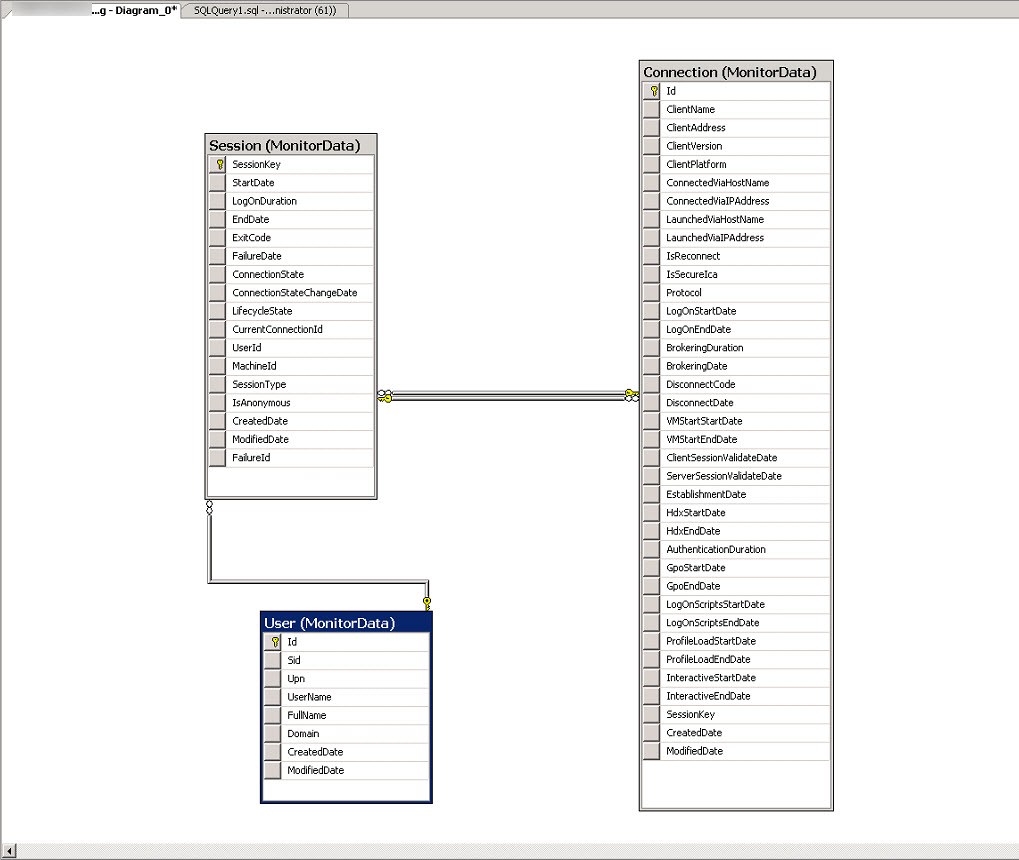
Just have a look at the underlying SQL DB and its Database Diagram in order to reveal the tables’ relationships:
| Relationship Name | Table Name | Tables Specification | Columns Specifiation |
|---|---|---|---|
| Session_User | Sessions | Foreign Key Column | UserId |
| Users | Primary Key Column | Id | |
| Connection_Session | Foreign Key Column | SessionKey | |
| Primary Key Column | SessionKey | ||
| Session_CurrentConnection | Connections | Foreign Key Column | CurrentConnectionId |
| Sessions | Primary Key Column | Id |
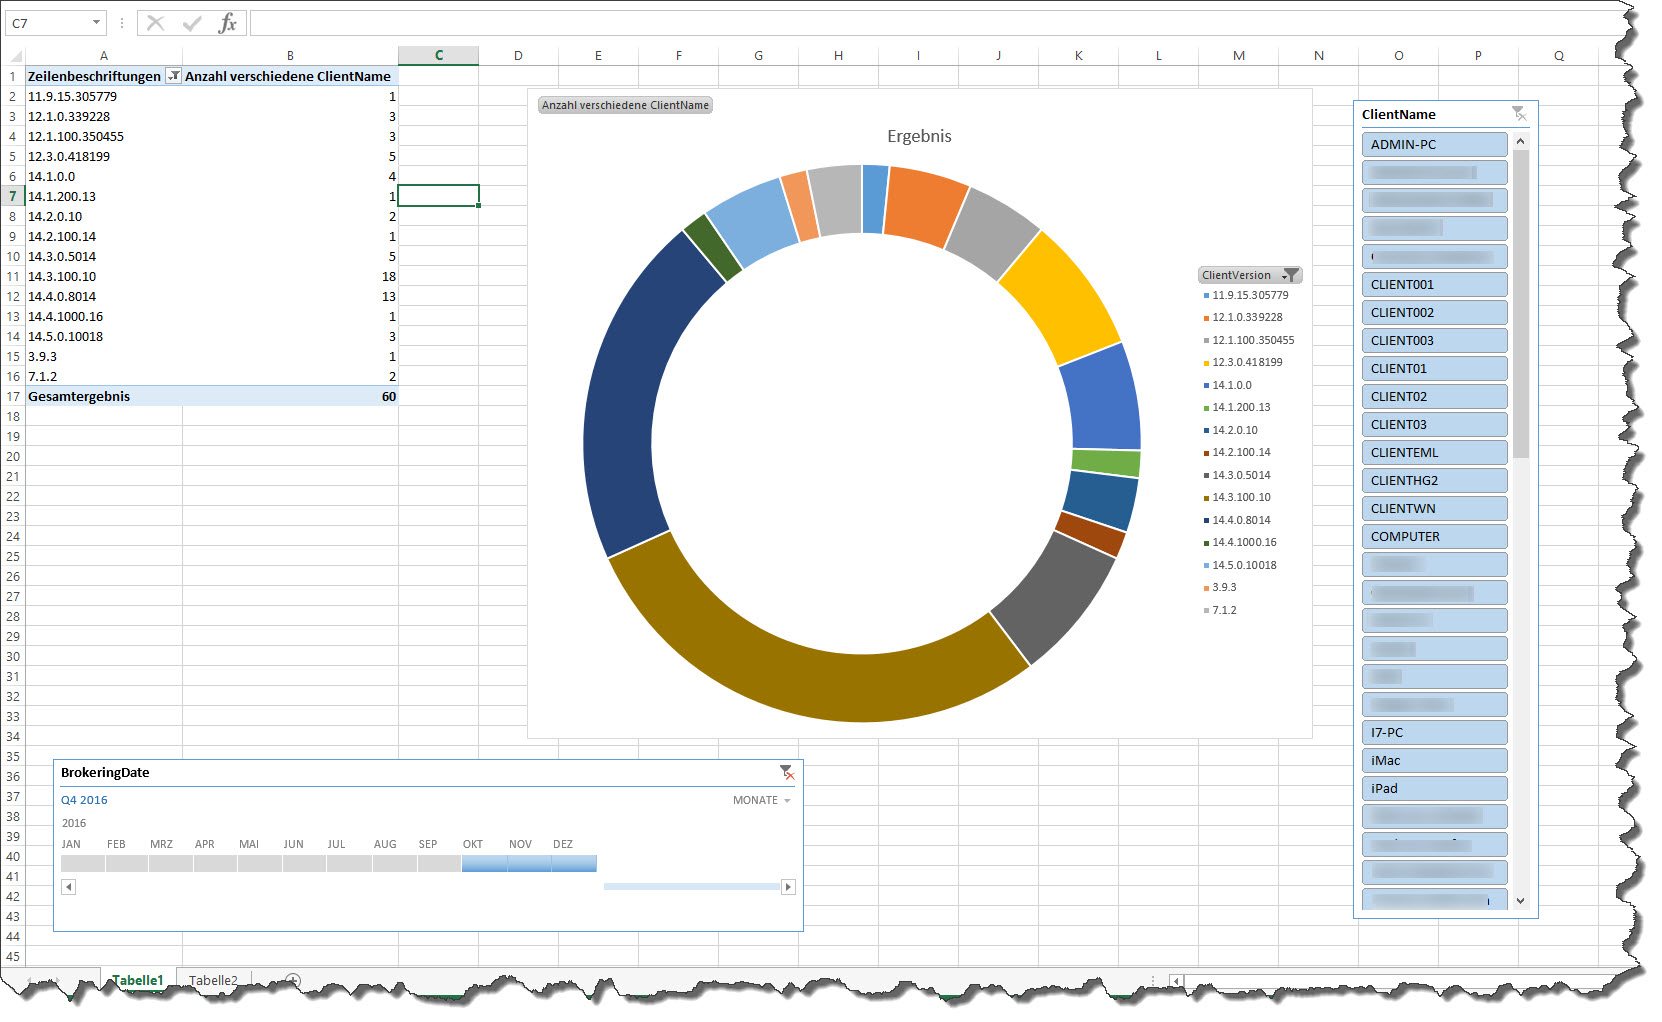
Then you should be able to rebuild these relationships within Microsoft Excel and get the resultant set of data including corresponding user names:
Otherwise you could create a corresponding View directly within SQL Server Management Studio on the server hosting your XenDesktop SQL Monitoring database. I created one and called it v_ReceiverVersions, thus allowing me to access the data through Excel as well. The custom View includes the aforementioned tables
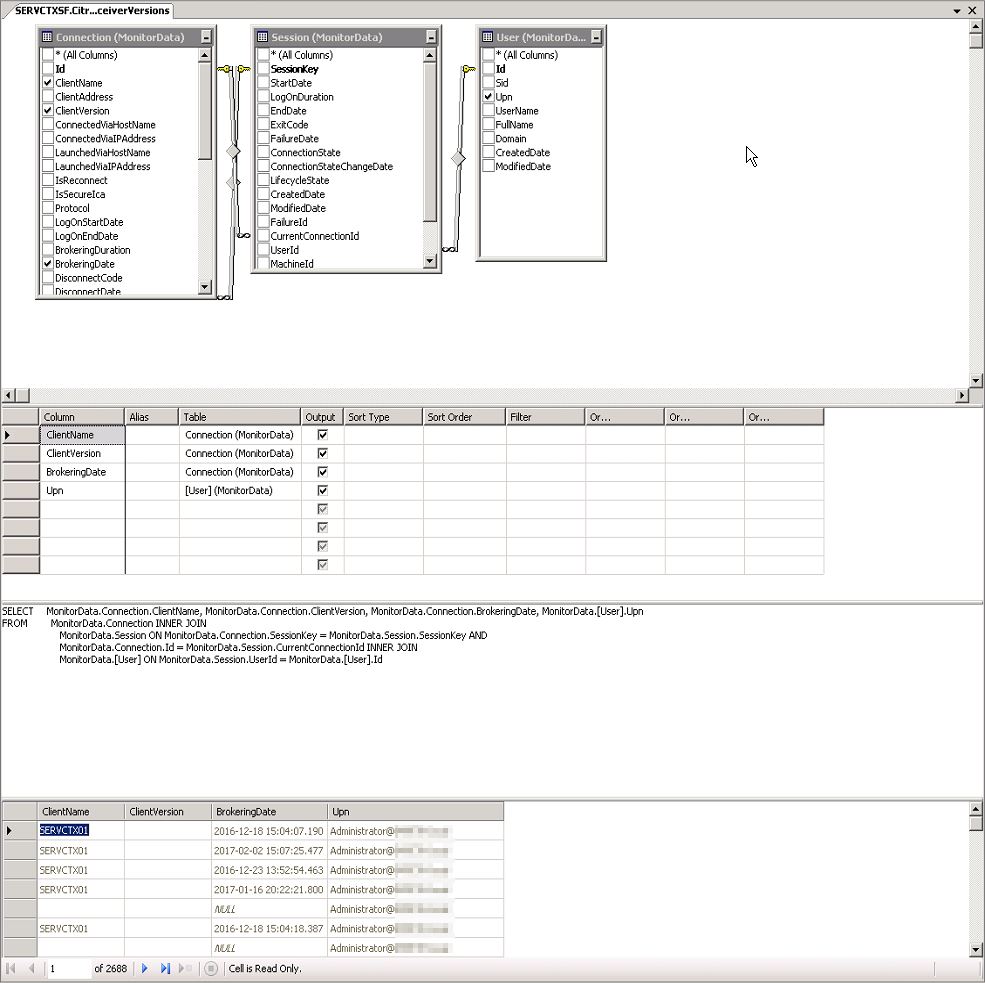
SELECT MonitorData.Connection.ClientName, MonitorData.Connection.ClientVersion, MonitorData.Connection.BrokeringDate, MonitorData.[User].Upn
FROM MonitorData.Connection INNER JOIN
MonitorData.Session ON MonitorData.Connection.SessionKey = MonitorData.Session.SessionKey AND
MonitorData.Connection.Id = MonitorData.Session.CurrentConnectionId INNER JOIN
MonitorData.[User] ON MonitorData.Session.UserId = MonitorData.[User].Id
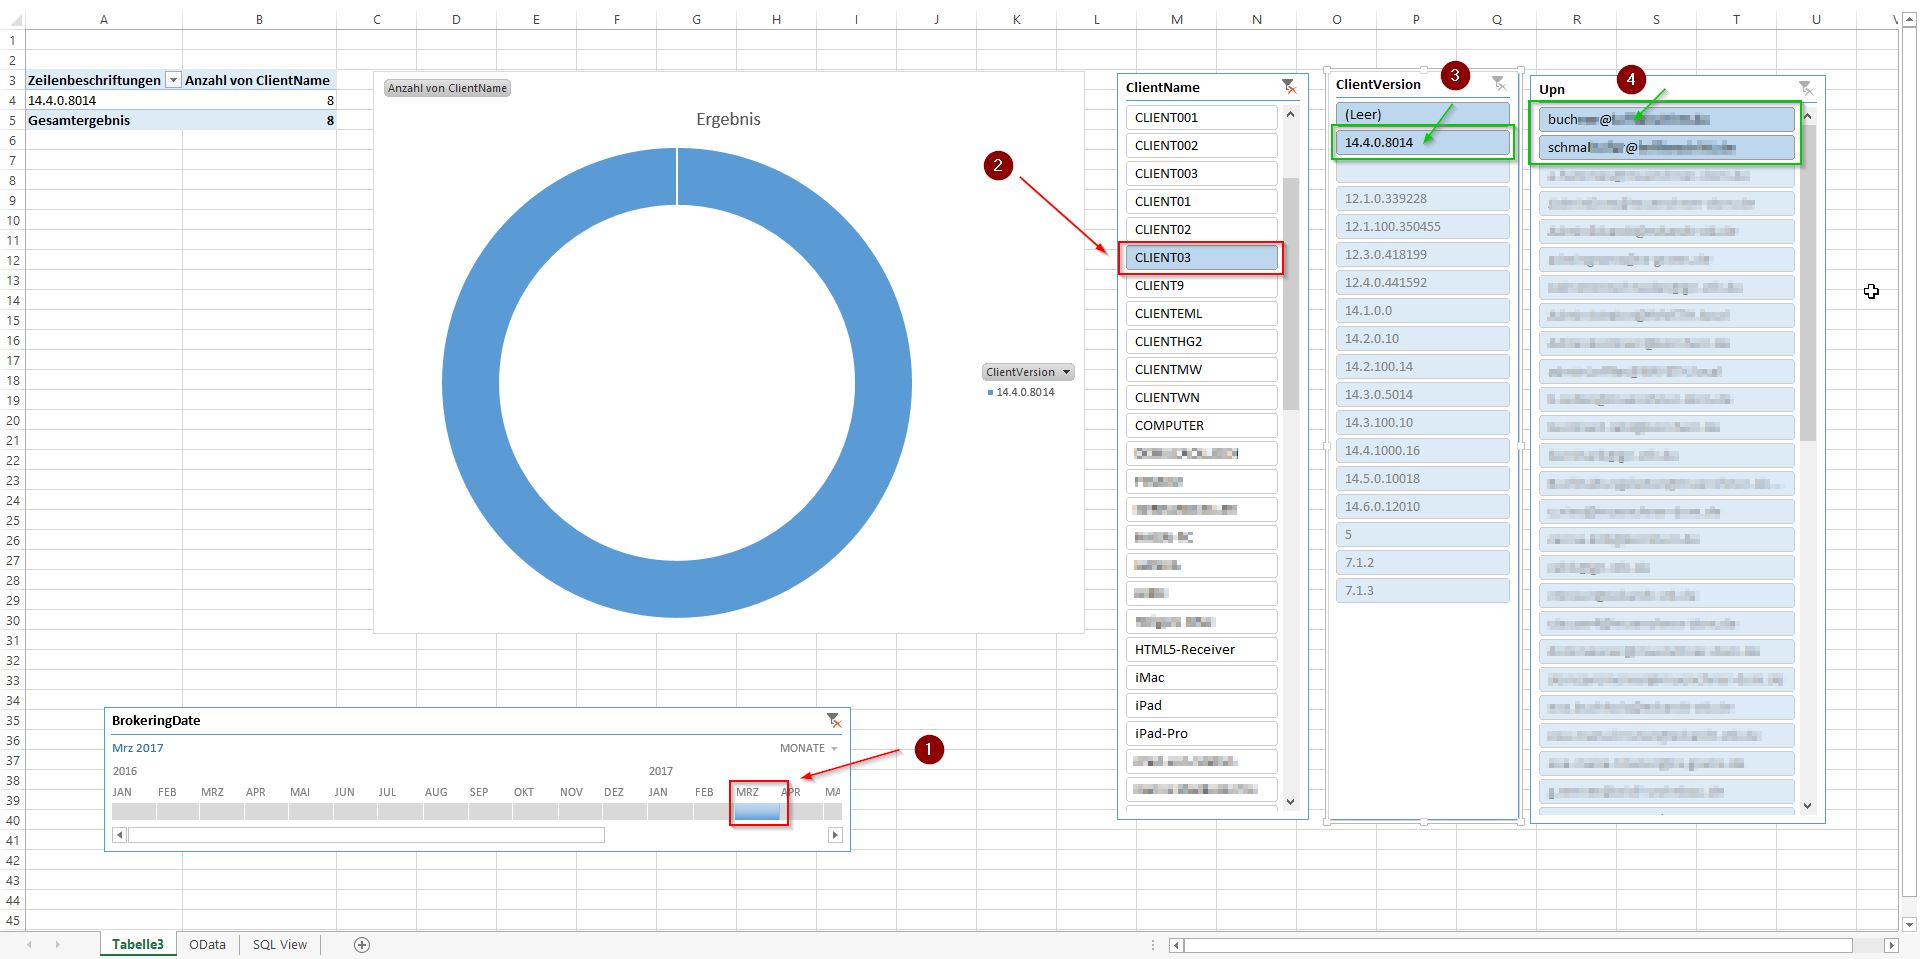
This setup allows me to filter the available data (i.e. set to the required period in time by utilizing the BrokeringDate) by either choosing ClientName, ClientVersion or UPN:
The data available in Citrix Director is dependent on your Citrix License, which in turn determines your usage data retention within Citrix Director. As per Citrix:
- All editions: Director – real-time monitoring and basic troubleshooting (up to 7 days of data)
- XD7 Platinum: EdgeSight performance management feature – includes #1 + historical monitoring (up to a full year of data through the monitoring SQL database)
- XD7 Platinum + NetScaler Enterprise: EdgeSight performance management and network analysis – includes #2 plus 60 mins. of network data
- XD7 Platinum + NetScaler Platinum: EdgeSight performance management and network analysis – includes #2 plus unlimited network data
Further reading:
If you want to use your NetScaler for all things that need to be accessible from the outside, over a single IP address, that poses an issue. As is usually a problem with small to medium sized businesses which only have one public IP address at their disposal, and need to implement features like a fully functional RDS environment (with RD Web Access, RD Gateway, etc), a XenApp/XenDesktop evnironment with StoreFront, and even AD FS, say, for Office365. Generally all these services require port 443 (https) to be fully functional, and you can only set up one distinctive IP address on your NetScaler providing this service, pointing it to your internal resources via Firewall rules, thus leaving you with only one option: NetScaler’s Unified Gateway and Content Switching features.
After logging into Exchange 2016’s ECP you receive an HTTP Error 500 (same goes with OWA):

Searching the internet ends up with several possible solutions to this issue, ranging from missing System Attendant Mailboxes, to bogus ADSI settings regarding the Exchange CAS Service. I tried several of them to no prevail.