As I did quite some Exchange migrations (including single as well as multi tenancy environments) I was always wondering whether there are any additional post migration tasks that need to be addressed before you start removing your legacy Exchange server(s) from your organization. For instance, as with migrating from Exchange 2003 to, say, Exchange 2010 you had to update Global Address Lists, Address Lists, Offline Address Books, et al to the new Exchange 2010 version by executing the corresponding cmdlts, e.g. Move-OfflineAddressBook. Now when migrating from Exchange 2010 to Exchange 2016 (or even just from Exchange 2013 to Exchange 2016 with both having an almost identical architecture) what remains of those post migration tasks? Which ones are a necessity? What kind of architectural changes require you to think different and adjust certain settings prior to removing your legacy Exchange server(s)?
By talking about post migration tasks, what do I mean? Well, after you’ve successfully migrated all your databases, mailboxes, public folders, send/receive connectors, et al, what’s still left? Maybe the not so obvious parts of your Exchange infrastructure that need addressing as well in order to avoid any unwanted behaviors and/or errors after you removed the last legacy Exchange server from your organization.
The following article is a concentrated and (hopefully) comprehensive set of information collected from various sources. I’m not reinventing the wheel here, just trying to consolidate every kind of post migration task that deems necessary for a successful Exchange 2016 migration. Pls feel free to comment whether this all still is reasonable and required.
The article consists of the following topics:
- System/Arbitration Mailboxes
- Distribution Groups
- Offline Address Books
- Address Book Policies
- Global Address Lists
- Address Lists
- IIS Log Analysis
- Send Connectors
- Receive Connectors
- Update Internal DNS Records
1. System/Arbitration Mailboxes
Before any production services are cut over to Exchange 2016 it is imperative to move the arbitration mailboxes. Arbitration mailboxes are system mailboxes used to store organization-wide data, e.g. administrator audit logs, metadata for eDiscovery searches, and Unified Messaging data. They need to be hosted on the highest version of Exchange in the organization. The mailboxes themselves are typically quite small and will move fairly quickly.
Run the following command to move the mailboxes to a database on your Exchange 2016 server:
Get-Mailbox -Arbitration | New-MoveRequest -BatchName "Arbitration" -TargetDatabase <NameOfTargetDB>
Verify that you’ve successfully migrated all of your abritration mailboxes to an Exchange 2016 database by running:
Get-Mailbox -Arbitration | ft Name, DisplayName, Database -AutoSize
Further reading:
2. Distribution Groups
For each message that is sent to a distribution group, Exchange must access the full membership list to route the message to all recipients. Expansion servers route messages that are sent to a single distribution list or group for each of the recipient objects in that list or group. When a user sends a message to a group, the Exchange server that is acting as the expansion server expands the group to its individual members. This expansion permits members of the distribution list or group to receive the message. An expansion server also resolves the names of all recipients in the distribution list or group, and then determines the most efficient path for routing the message.
Get-DistributionGroup -ResultSize Unlimited | Set-DistributionGroup -ExpansionServer SERV-MAIL.domain.local
Furthermore upgrading distribution groups from Exchange 2007 to Exchange 2016 has 3 steps:
- Distribution groups must be upgraded
- Distribution group owners must be set, and
- the homeMTA property needs to be cleared.
The following powershell code will set things straight (courtesy of Cooper):
#Forces Upgrade of all distribution groups
Get-DistributionGroup –resultsize unlimited | Set-DistributionGroup –ForceUpgrade
#Set All Distribution Group Owners (Required for Exchange 2010/2013 if missing causes errors)
#Change the owners to the desired domain accounts replace USER@DOMAIN.COM
Get-DistributionGroup -ResultSize Unlimited | Set-DistributionGroup -BypassSecurityGroupManagerCheck -ManagedBy 'USER@DOMAIN.COM’,’USER2@DOMAIN.COM’
#Clear homeMTA property for a single distribution group (If any distribution groups have this property set it can force a specific server to send distribution group messages)
Get-DistributionGroup | ForEach { Set-ADGroup -Identity $_.samAccountName -Clear homeMTA }
Further reading:
- Exchange server Distribution Group Expansion Server
- Removing the “Set expansion server” setting for a Exchange Server 2010 distribution group that is still referencing an Exchange 2003 Server
- Migration of Distribution Groups from Exchange 2007 / 2010 to 2013
- TechNet – Configure Distribution Group Properties
- Upgrade Exchange 2013 Distribution Groups from Exchange 2007
3. Offline Address Books
An OAB is used by Microsoft Outlook clients in Cached Exchange Mode for address book lookups when offline. OABs are also critical in reducing the workload on Exchange servers as cached mode Outlook clients will always query the local OAB first.
Remove Legacy Default OAB:
The legacy offline address book can be removed from the organization when there are no more Exchange 2010 mailbox users. Exchange 2016 mailbox users will be using the new Default OAB created by Exchange 2016 setup (easily identifieable by the subsequent (Ex2013) string in the OAB’s name, e.g. Default Offline Address List (Ex2013)). Simply use the Exchange 2010 Management Console (EMC) to do so. You can then adjust the display name of your new Default OAB at any point in time by running:
Set-OfflineAddressBook “Default Offline Address List (Ex2013)” -Name “Default Offline Address List”
OAB Distribution:
Exchange 2007 and 2010 supported two methods of OAB distribution: web distribution and Public Folder distribution. Exchange 2013/2016 supports the web distribution method only.
1st disable Public Folder Distribution:
Get-OfflineAddressBook -ResultSize Unlimited | Set-OfflineAddressBook -PublicFolderDistributionEnabled $false
2nd enable Web Distribution:
Get-OfflineAddressBook | Set-OfflineAddressBook -VirtualDirectories {SERV-MAIL\OAB (Default Web Site)}
OAB and Generating Mailbox:
In Exchange 2016, the OAB is first generated in the Arbitration Mailbox so understanding which database houses this Arbitration Mailbox is key to understanding the server that is currently responsible for generating the OAB. Once generated, the OAB is then later copied as a series of files to the \ClientAccess\OAB folder on each mailbox server.
We need to move the OAB generation to Exchange 2016. It doesn’t matter how many OABs we have in our organization, but we still need at least one (1) mailbox with PersistedCapabilities of OrganizationCapabilityOABGen, and it doesn’t really matter which mailbox we use. We can even set which mailbox generates which OAB.
First of all identify the current Generating Mailbox, i.e. the Organization Mailbox, and note it’s Name, e.g. SystemMailbox{bb558c35-97f1-4cb9-8ff7-d53741dc928c}:
Get-Mailbox -Arbitration | where {$_.PersistedCapabilities -like "*OAB*"} | Format-List Name,ServerName,PersistedCapabilities,Database
![]()
Storing the OAB files in a dedicated Organization Mailbox (e.g. OABGen) makes the OAB files more resilient. You can change the Arbitration Mailbox for an OAB at any time as long as the corresponding OAB has an ExchangeVersion property value of at least 0.20 (15.0.0.0):
Set-OfflineAddressBook -Identity "OAB" -GeneratingMailbox "OABGen"
Error:
GeneratingMailbox can only be set on an Exchange 2012 or newer OAB.
Exchange 2010 OABs have an ExchangeVersion value of 0.10 (14.0.100.0), whereas an Exchange 2016 OAB has a value of 0.20 (15.0.0.0). Legacy OABs cannot be assigned an Organization Mailbox.
Custom OABs:
As of a multi tenancy hosting configuration with Exchange 2016 and its subsequent requirement of Address Book segregation I once had to implement a couple of custom built OABs. The goal is to host multiple groups of people (i.e. customers) within the same Active Directory and Exchange Organization and give them their own address book environment. It is important that these customer groups don’t see each others address lists because they might contain sensitive information.
To get a list of all OABs run the following command:
Get-OfflineAddressBook | Format-List Name,GUID,GeneratingMailbox


To create new OABs based on your existing OABs run the following command which adds a subsequent 2016 to the OAB’s Name property and retains the corresponding Address Lists used to populate the OAB in the AddressLists property:
ForEach ($i in (Get-OfflineAddressBook -Server <FQDN Exchange 2010 Server>)) {$name = $i.name+" 2016"; New-OfflineAddressBook -Name $name -AddressLists $i.AddressLists}
Get-OfflineAddressBook *2016* | fl Name,ExchangeVersion,GeneratingMailbox

Verify newly created Exchange 2016 OABs with ExchangeVersion property of 0.20 (15.0.0.0)
Get-OfflineAddressBook *2016* | fl Name,ExchangeVersion,Generating*
![]()
Now you can remove legacy OABs from Exchange 2010 (consider Address Book Policy dependencies, which need to be adjusted prior to removing legacy OABs!)
Get-OfflineAddressBook -Server <FQDN Exchange 2010 Server> | Remove-OfflineAddressBook
By browsing to https://<FQDN>/oab/<OAB GUID>/oab.xml to the OAB from the clients using IE and not get any cert or IIS errors, The FQDN value depends on what’s configured for the OAB internal/external URLs:
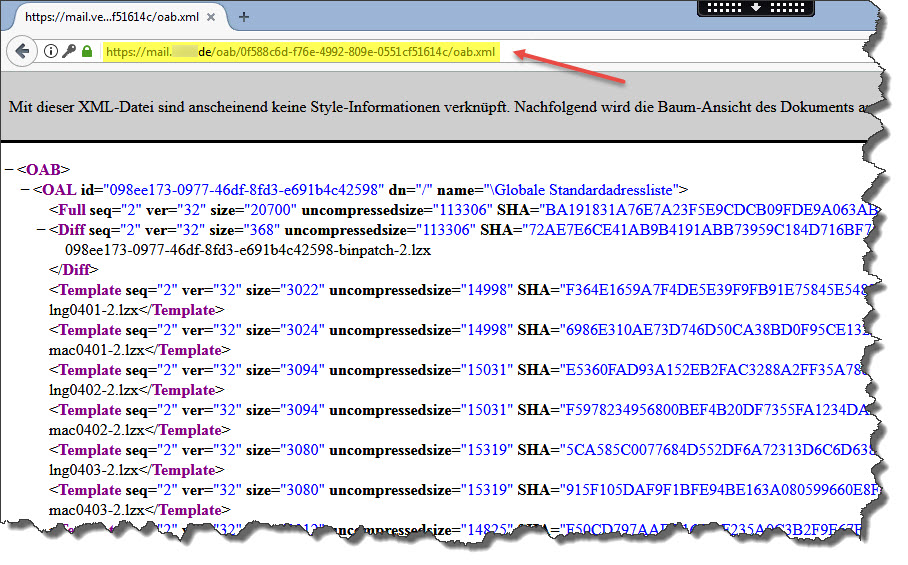
The OAB GUID can be retrieved by issuing the following command:
Get-OfflineAddressBook *Default* | fl Name,Guid
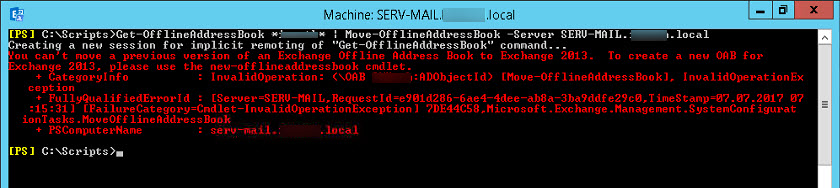
Move-OfflineAddressBook:
As per Microsoft:
Use the Move-OfflineAddressBook cmdlet to designate a new server responsible for generating the offline address book (OAB) in Exchange Server 2010. This cmdlet isn’t used on OABs in Exchange Server 2016 or Exchange Server 2013. To perform this task in Exchange 2016 or Exchange 2013, use the Set-OfflineAddressBook cmdlet with the GeneratingMailbox parameter.
Get-OfflineAddressBook *OAB* | Move-OfflineAddressBook -Server serv-mail.domain.local
Error:
You can’t move a previous version of an Exchange Offline Address Book to Exchange 2013. To create a new OAB for Exchange 2013, please use the New-OfflineAddressBook cmdlet.
Exchange 2010 OABs have an ExchangeVersion value of 0.10 (14.0.100.0), whereas an Exchange 2016 OAB has a value of 0.20 (15.0.0.0). Legacy OABs cannot be updated using Move-OfflineAddressBook anymore. They need to be newly created instead.
After all adjustments have been completed you can update your OABs by running:
Get-OfflineAddressBook -ResultSize Unlimited | Update-OfflineAddressBook
Furthermore you should ensure that each and every database has an OAB assigned in order to avoid mailbox users on the databases without OfflineAddressBook set re-downloading the entire OAB. This can be performed with:
Get-MailboxDatabase | Set-MailboxDatabase -OfflineAddressBook "<Name Of Your Default OAB>"
Further reading:
- TechNet – Procedures for offline address books in Exchange 2016
- reddit – OAB not working after demoting last 2010
- Microsoft Exchange Team Blog – OAB in Exchange Server 2013
- Microsoft Exchange Team Blog – Managing OAB in Exchange Server 2013
- Exchange 2016 Wrong Offline Address Book Name
- Offline Address Book Changes in Exchange 2013
- Exchange 2013 OAB Distribution
4. Address Book Policies
As of a multi tenancy hosting configuration with Exchange 2016 and its subsequent requirement of Address Book segregation I once had to implement a couple of custom built OABs as well as Address Book Policies. The goal is to host multiple groups of people (i.e. customers) within the same Active Directory and Exchange Organization and give them their own address book environment. It is important that these customer groups don’t see each others address lists because they might contain sensitive information. The recommended approach defined by Microsoft:
- Address book policy objects are the only supported solution to ensure an authenticated user can access only their own tenant’s GAL, OAB and address list objects.
- One or more ABP objects can be created per tenant and assigned to the users as they are provisioned.
- ABPs can be used to control GAL, OAB and address list object access for clients that client accesses Exchange with an Outlook client (Windows or Mac), EWS application, a mobile device or OWA.
- Having both ACLs and ABPs are only supported for the length of a migration from one to the other.
Prepare a corresponding CSV file with required property information, e.g. Name and OfflineAddressBook
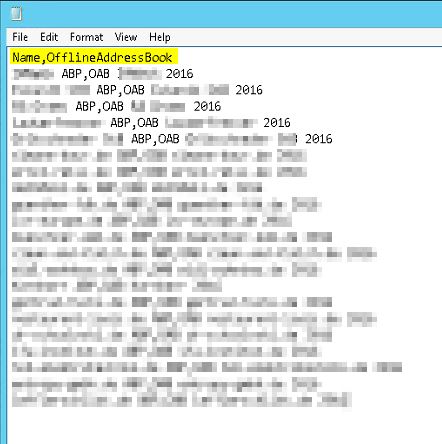
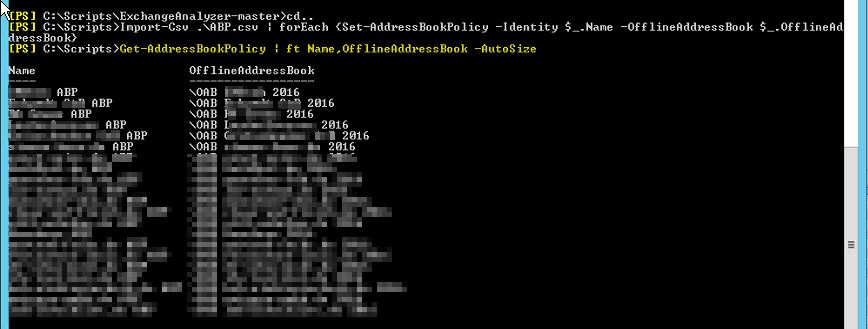
Run the following command in order to assign the newly created Exchange 2016 OABs to your existing ABPs (assuming you have an appropriate naming convention in place that allows for easy adjusting), and verify whether all ABPs have the corresponding OAB successfully assigned:
Import-Csv .\ABP.csv | forEach {Set-AddressBookPolicy -Identity $_.Name -OfflineAddressBook $_.OfflineAddressBook}
Get-AddressBookPolicy | ft Name,OfflineAddressBook -AutoSize
Further reading:
- TechNet – Multi-Tenancy and Hosting Guidance for Exchange Server 2013
- TechNet – Multi-Tenant Scalability Guidance for Exchange Server 2013
5. Global Address Lists
GALs don’t need any special consideration in terms of Exchange migration as they are part of the Exchange attributes in Active Directory. When you migrate by way of installing Exchange 2016 on a new system within your existing legacy Exchange environment, Exchange 2016 recognizes the same Exchange attributes in Active Directory.
You can verify this by using ADSIEdit.msc and navigating to CN=Microsoft Exchange,CN=Services,CN=Configuration,DC=DOMAIN,DC=local. Open this node’s Properties and check the value of attributes globalAddressList and globalAddressList2 that contain all the GALs being present in your Exchange environment and thus can be seen and used by any Exchange server wihtin your Exchange organization:
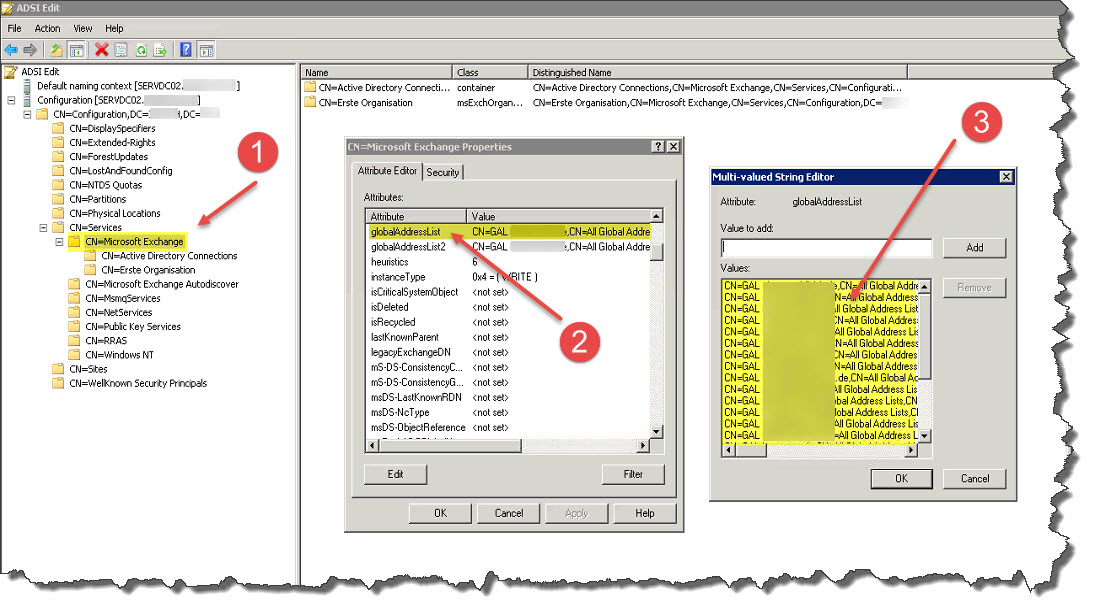
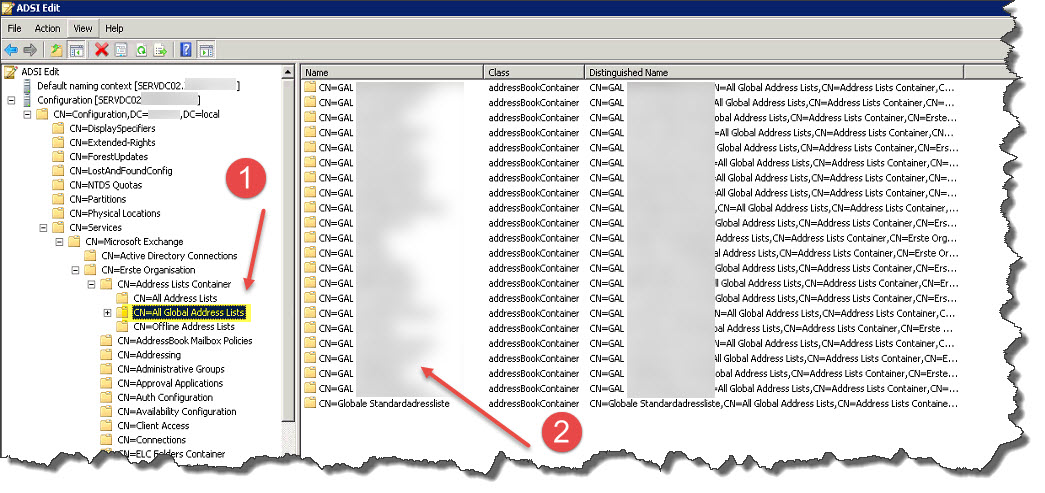
Furthermore they exist a couple of containers representing your GALs which are stored in CN=All Global Address Lists,CN=Address Lists Container,CN=<Organization Name>,CN=Microsoft Exchange,CN=Services,CN=Configuration,DC=DOMAIN,DC=local:
Further reading:
6. Address Lists
The same goes for ALs as they don’t need any special consideration in terms of Exchange migration as they are part of the Exchange attributes in Active Directory, too. When you migrate by way of installing Exchange 2016 on a new system within your existing legacy Exchange environment, Exchange 2016 recognizes the same Exchange attributes in Active Directory.
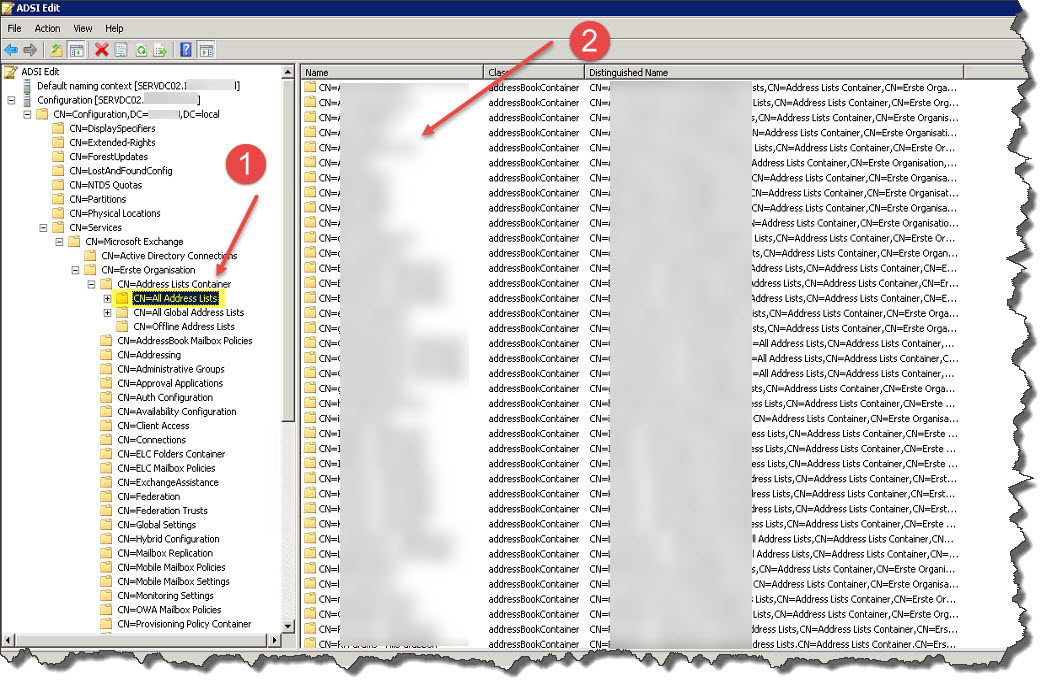
You can verify this by using ADSIEdit.msc and navigating to CN=All Address Lists,CN=Address Lists Container,CN=<Organization Name>,CN=Microsoft Exchange,CN=Services,CN=Configuration,DC=DOMAIN,DC=local:
Get-AddressList -ResultSize Unlimited | Update-AddressList
Further reading:
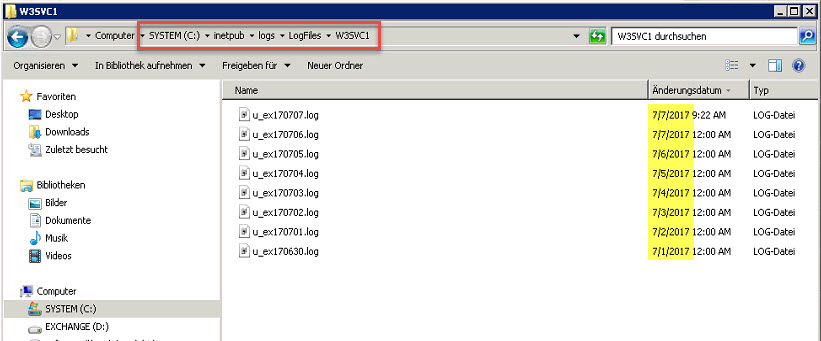
7. IIS Log Analysis
Client Access servers can be removed when they are no longer serving any client requests. You can verify that no more traffic is hitting the Client Access server by reviewing the IIS logs on the server. Note that you will likely see continued hits in the logs from the Exchange 2016 servers themselves, or from any connections to the /PowerShell virtual directory by administrators. You can use Log Parser to determine which users (if any) are still making connections to the server.
For example:
logparser.exe "select Count(cs-username) as Count, cs-username as Username from 'C:\inetpub\logs\logfiles\w3svc1\*.*' group by Username order by Count(Username)" -i:IISW3C
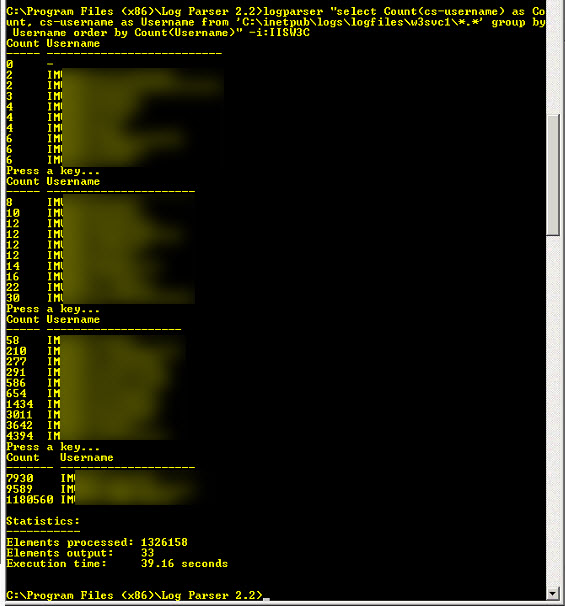
Just be aware that querying a wildcard like ‘C:3svc1*.*’ will return results from any log file in that directory, which may be months or even years worth of log data. You can refine the search by removing older log files from the directory C:\inetpub\logs\LogFiles\W3SVC1:
8. Send Connectors
Note the configuration and settings of any Send Connector you’ve configured on your Exchange 2010 environment in order successfully replicate its settings to the corresponding Exchange 2016 Send Connector and keep your mail flow up.
Every Send Connector has a HomeMtaServerId Property that usually refers to your legacy Exchange 2010 server and needs adjusting, as well as the SourceTransportServers Property. To get the current Send Connector settings run the following command:
Get-SendConnector | fl Name,*Server*
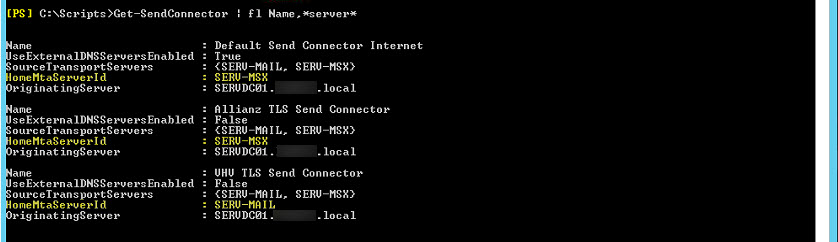
To adjust both HomeMtaServerId and SourceTransportServers with your current Exchange 2016 server, run the following command:
Get-SendConnector | Set-SendConnector -SourceTransportServers "<ServerName>"

9. Receive Connectors
Note the configuration and settings of any Receive Connector you’ve configured on your Exchange 2010 environment in order successfully replicate its settings to the corresponding Exchange 2016 Receive Connector and keep your mail flow up.
![]()
10. Update Internal DNS Records
What you should have done almost right after you’ve installed your first Exchange 2016 within your existing legacy Exchange organization is to update your internal DNS records to point to Exchange 2016, i.e. mail.domain.com and autodiscover.domain.com. (or in case you have a Load Balancer in place adjust the corresponding settings there in order to redirect traffic accordingly). As of now, your current DNS records will be pointing to your Exchange 2010 server. Update the records to point to Exchange 2016 server for web traffic and mail flow.
For ease of administration you could configure all of your devices that use Exchange for messaging purposes, e.g. sending alert and/or monitoring mails right through a dedicated Receive Connector, with a common FQDN mail.domain.com, thus relieving you from having to adjust those systems after every migration and/or change in server name or IP address, as you only need to adjust the corresponding DNS record in your DNS zone.
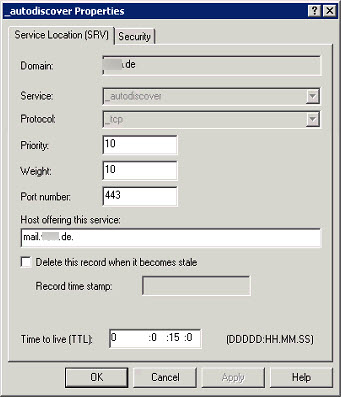
Furthermore ensure updating your Autodiscover SRV record as well, e.g. _autodiscover._tcp.domain.com.
In your DNS zone editor add a SRV record with the following settings:
- Service: _autodiscover
- Protocol: _tcp
- Name: Enter one of the following values:
- Enter @ if your registered domain is your cloud-based domain. For example, if your registered domain is contoso.com and your cloud-based domain is contoso.com, enter @.
- Enter the subdomain name if your cloud-based domain is a subdomain of your registered domain. For example, if your registered domain is contoso.com, but your cloud-based domain is the subdomain test.contoso.com, enter test.
- Priority: 10 (or as per your design)
- Weight: 10 (or as per your design)
- Port: 443
- Target: mail.domain.com
- TTL: Verify that an appropriate TTL is selected, 1 hour is a common default. (If you are approaching a migration, this should be decremented to allow for quicker cutover)
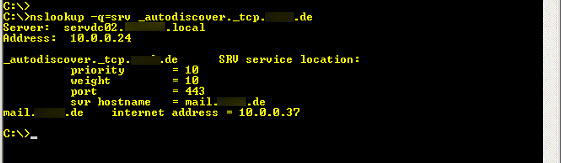
Verify Exchange Autodiscover SRV Record using nslookup:
nslookup -q=srv _autodiscover._tcp.domain.com
Once internal access is verified and everything is working as expected, update the external HTTPS publishing which for instance can be done via a NAT rule for TCP port 443 configured on a firewall. Send the traffic to Exchange 2016 (or a Load Balancer where applicable) instead of Exchange 2010 server.
In the end you should have something like this:
Exchange 2016 External DNS Records
| FQDN | Record Type | Value | TTL |
|---|---|---|---|
| domain.com | MX | mail.domain.com | 10mins |
| mail.domain.com | A | Public IP Address of your Exchange (either forwarded through a NAT rule or LB) | 10min |
| autodiscover.domain.com | A | Public IP Address of your Exchange (either forwarded through a NAT rule or LB) | 10min |
Exchange 2016 Internal DNS Records
| FQDN | Record Type | Value | TTL |
|---|---|---|---|
| mail.domain.com | CNAME | Exchange2016.domain.local or LB FQDN | 10mins |
| autodiscover.domain.com | A Records | Internal IP Adress of your Exchange 2016 Server or LB IP Address | 10mins |
| _autodiscover._tcp.domain.com | SRV Records | Internal IP Adress of your Exchange 2016 Server or LB IP Address | 10mins |
Further reading:
11. Public Folder Migration Requests
Prior to uninstalling an Exchange 2013 / 2016 instance from your Exchange environment you should check whether any Public Folder migration request is still existing. In case you try to uninstall an Exchange 2013 / 2016 server after having migrated everything to Exchange 2019 you may receive the following error message from the Setup’s Readiness Check:
Error:
Uninstall can’t continue. Errors:
This mailbox database is associated with one or more active PublicFolderMailboxMigration requests. To get a list of all PublicFolderMailboxMigration requests associated with this database, run Get-PublicFolderMailboxMigrationRequest | ?{ $_.RequestQueue -eq “<Database ID>” }. To remove a PublicFolderMailboxMigration request, run Remove-PublicFolderMailboxMigrationRequest <Recipient ID\Request Name>.
[…]
For more information, visit: http://technet.microsoft.com/library(EXCHG.150)/ms.exch.setupreadiness.UnwillingToRemoveMailboxDatabase.aspx
When trying to dismount and remove the last database from your Exchange 2013 / 2016 server you might receive a similar error message stating:
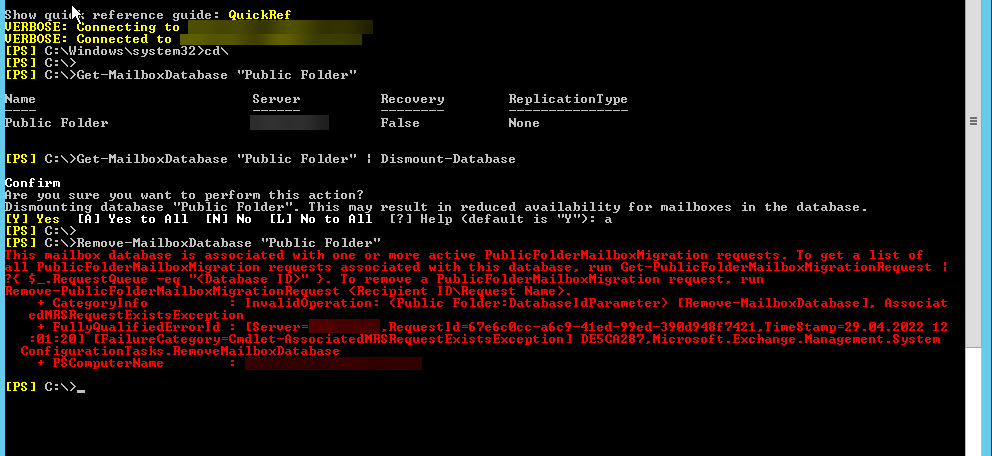
After ensuring that there were no Public Folder Mailbox Migration requests by executing the Get-PublicFolderMailboxMigrationRequest cmdlet, I did a quick search on the internet and found Terence Luks post, stating “that there may be a lingering object in the Configuration container that is not returned by the PowerShell cmdlets.” I did as Terence suggested:
I then went ahead and launched ADSIedit, connected to the Configuration container then browsed to:
Configuration > Services > Microsoft Exchange > ExchOrganization > Mailbox Replication displayed the following:
Opening these items showed that they were objects that corresponded to the day I had started the migration batch for the public folder migration so I went ahead and deleted these items in the folder then forced replication via repadmin /syncall /AdeP on a domain controller and was then able to delete the mailbox database.

The same goes for any existing mailbox move requests still existing in your environment. Prior to uninstalling Exchange 2013 / 2016 you have to remove any mailbox move request that still exists.
Further reading:
- Cannot remove mailbox database [UnwillingToRemoveMailboxDatabase]
Terence Luk – Attempting to delete an Exchange Server 2016 mailbox database previously used to migrate public folders from Exchange 2010 throws the error: “This mailbox database is associated with one or more active PublicFolderMailboxMigration requests…” - This mailbox database is associated with one or more move requests
Exchange Migration Sources:
- Paul Cunningham’s eBooks on Exchange Migration Scenarios
- TechNet – Step-by-Step Exchange 2007 to 2013 Migration
- EXCHANGE 2010 TO EXCHANGE 2016 MIGRATION – PART 1
- Exchange 2010/2013 to Exchange 2016 Migration Step by Step
- Exchange 2013 to 2016 Migration (Part 1)
- Migrate from Exchange 2010 to Exchange 2016